Introduction
In this document, we will guide you to setup your Smart POS system for the first time. Before starting the setup process of your Smart POS system, you are required to complete your configuration and Menu settings in the SmartOrder E-Portal System. Please refer to the Configuration Guide and Menu Setting Guide.
Installing the Smart POS
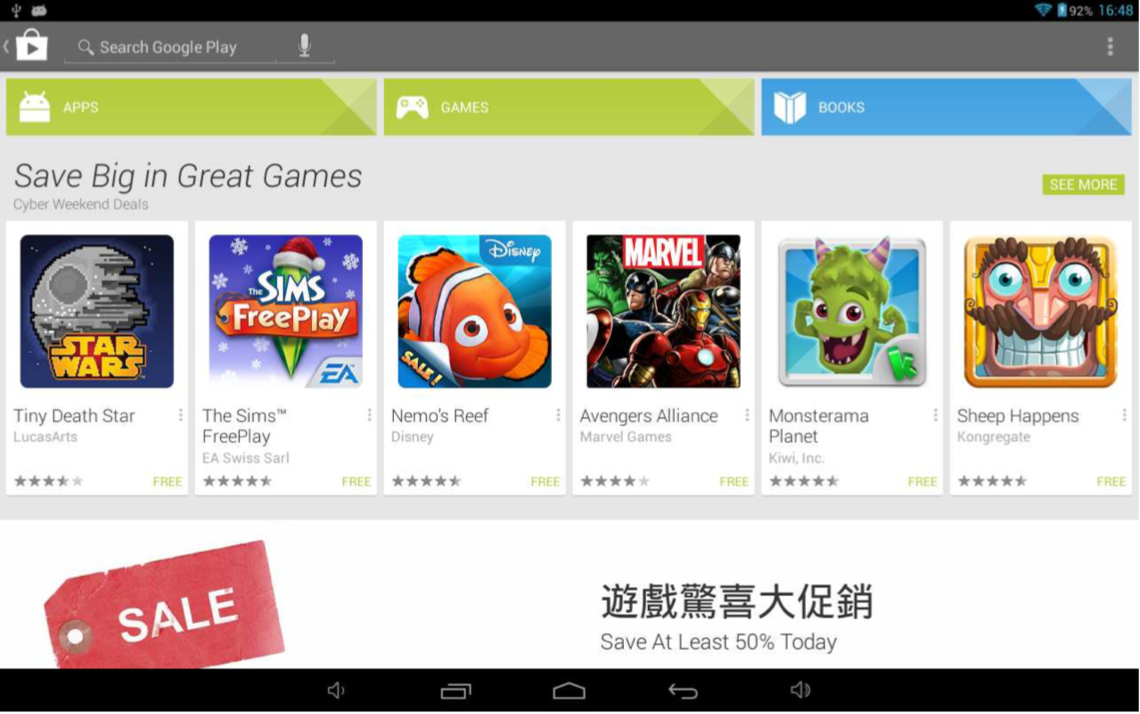
Smart POS is available in the Google Play Store. Please log on to Google Play Store and search for "Smart POS". Alternatively, you may download it from our website:
https://www.smartordersystem.com/release/smartorderpos.apk
https://www.smartordersystem.com/release/smartorderpos.apk
Initial Configuration
Please connect your Android machine or tablet computer to the internet. Please make sure your internet connection is stable during this configuration process. You may use the system offline after the configuration. Internet connection is needed when you need to log in or synchronize local data with the E-Portal cloud platform.
Logging In
By opening the Smart POS app, you can see the following screen. Please enter your user name and password in order to log on.
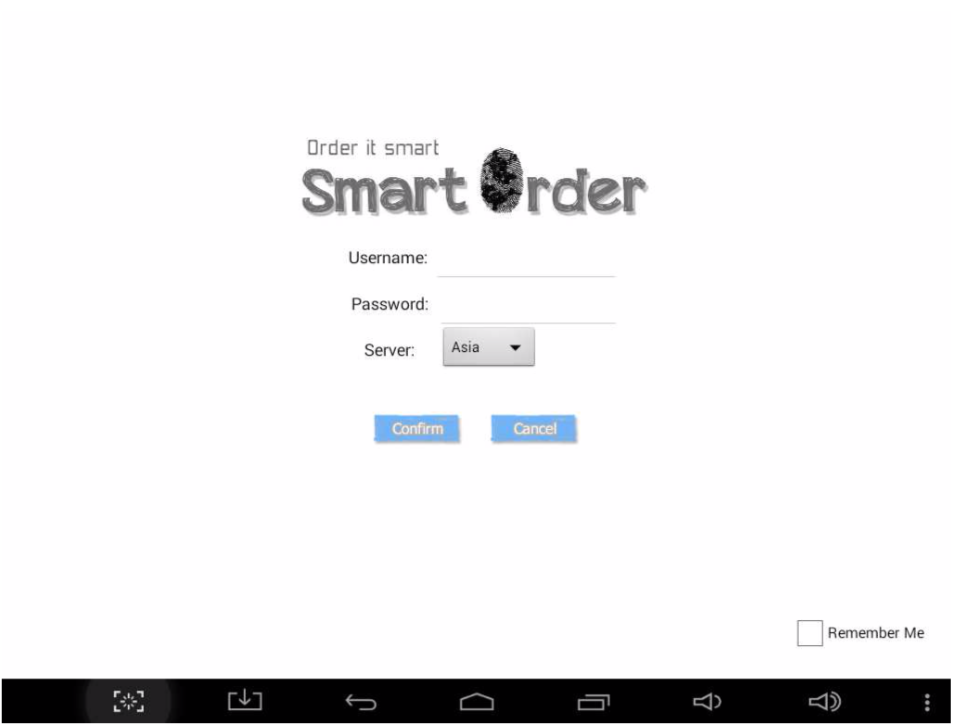
Username - Your user name in SmartOrder
Password - Your password in SmartOrder
Server - Please select the server as the same as where you purchase SmartOrder Remember me - You will be automatically logged in if you have this box checked
Password - Your password in SmartOrder
Server - Please select the server as the same as where you purchase SmartOrder Remember me - You will be automatically logged in if you have this box checked
Username and password for demo access
Username: demoaccount
Password: 12341234
Password: 12341234
Setup Your Restaurant Menu
At this moment, the Smart POS do not have any data yet. Please press the "Setting" button on the right to load the data.
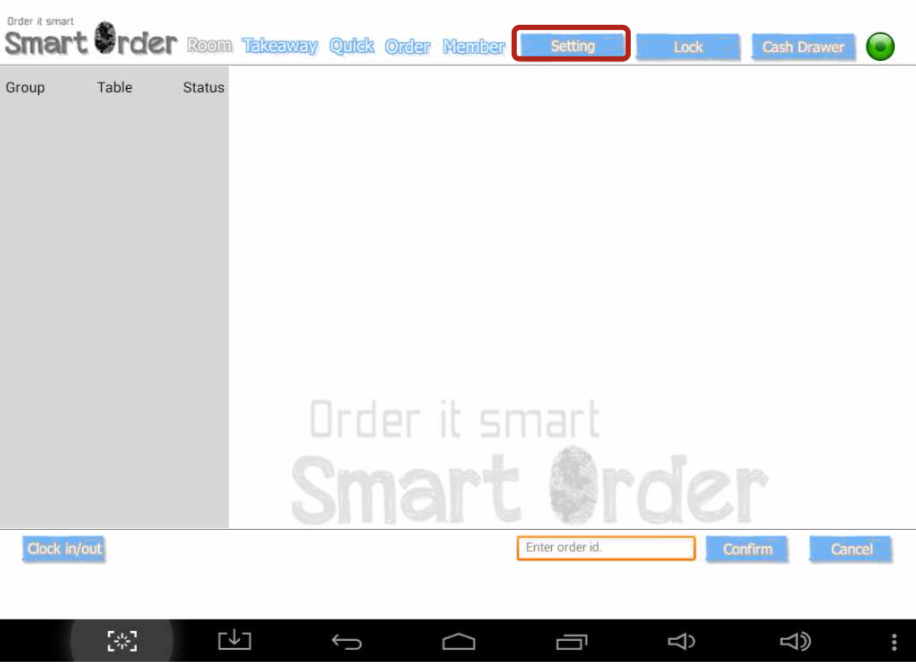
In the setting page, please press the "Reload Data" button and enter your password. Then press ok.
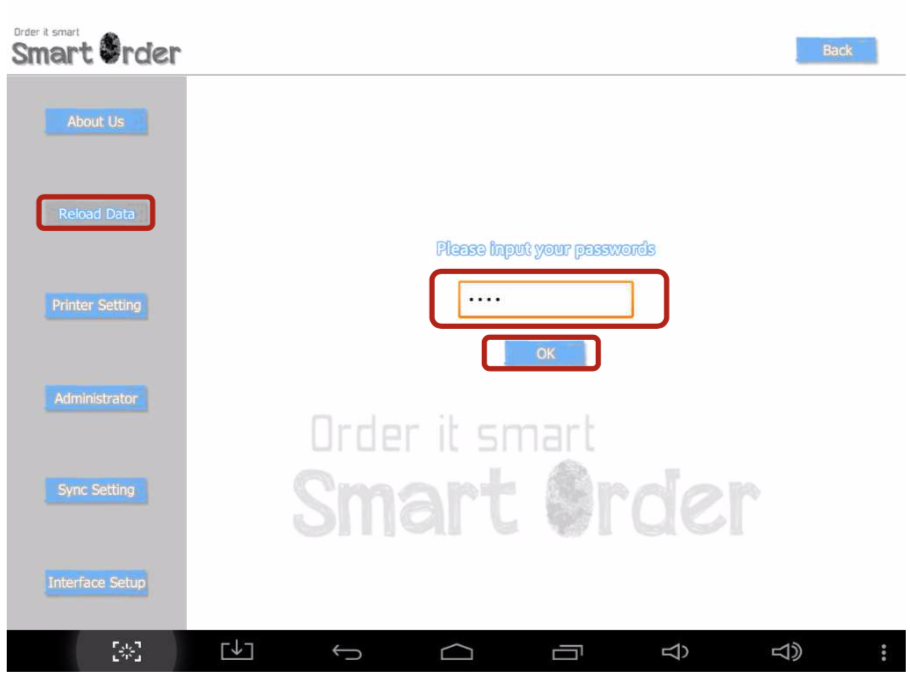
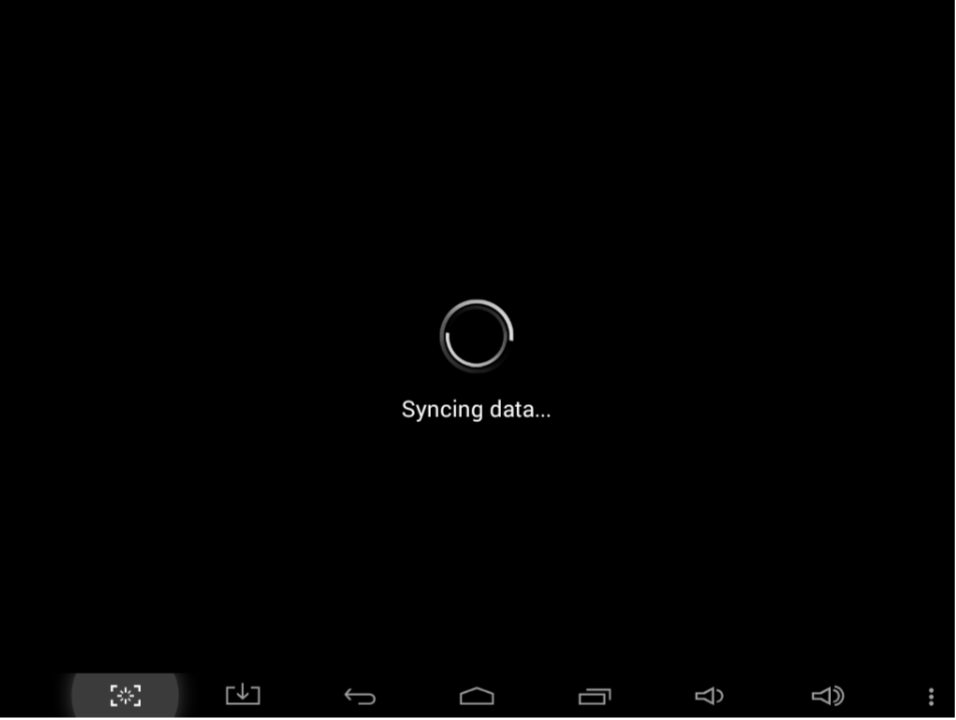
The system will load the data. Please be patient as it takes some time for downloading the data. However, if the process is not done within 15 minutes, please restart it.
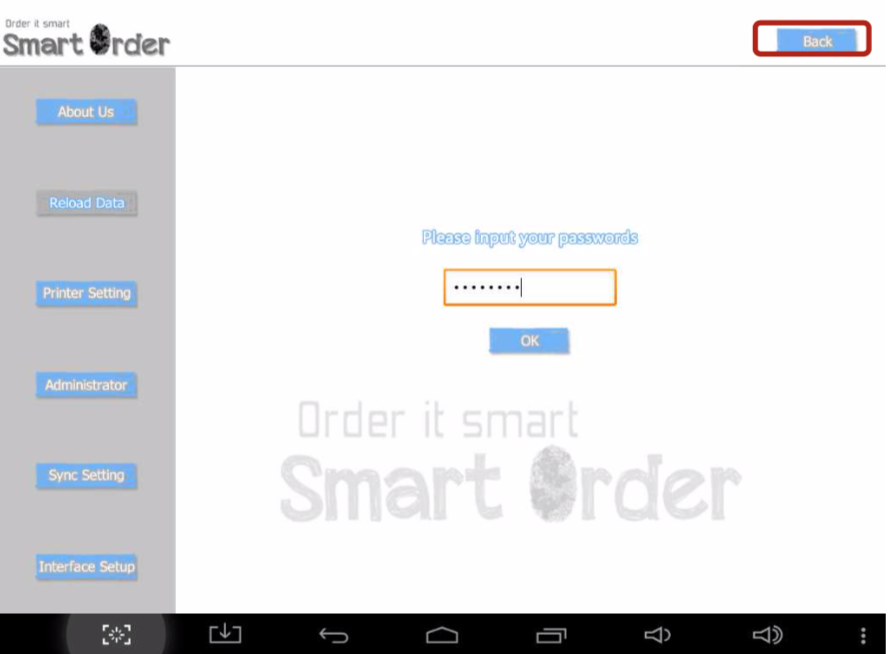
After downloading the data, please press the "back" button at the top-right corner.
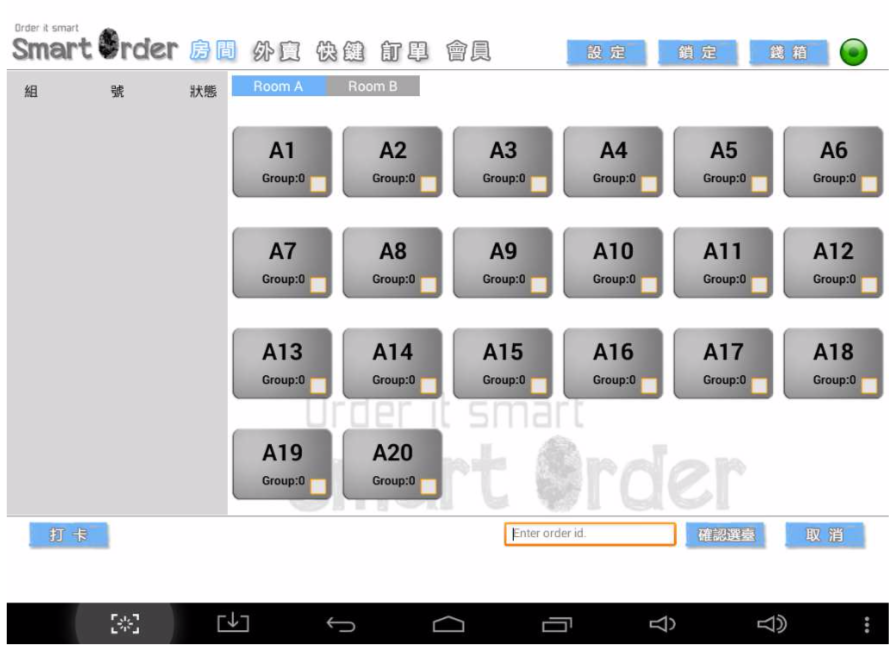
You will be redirected to the main page. You can now see the layout of table.
Printer Settings
Please press the "Setting" button on the right to enter the settings page.
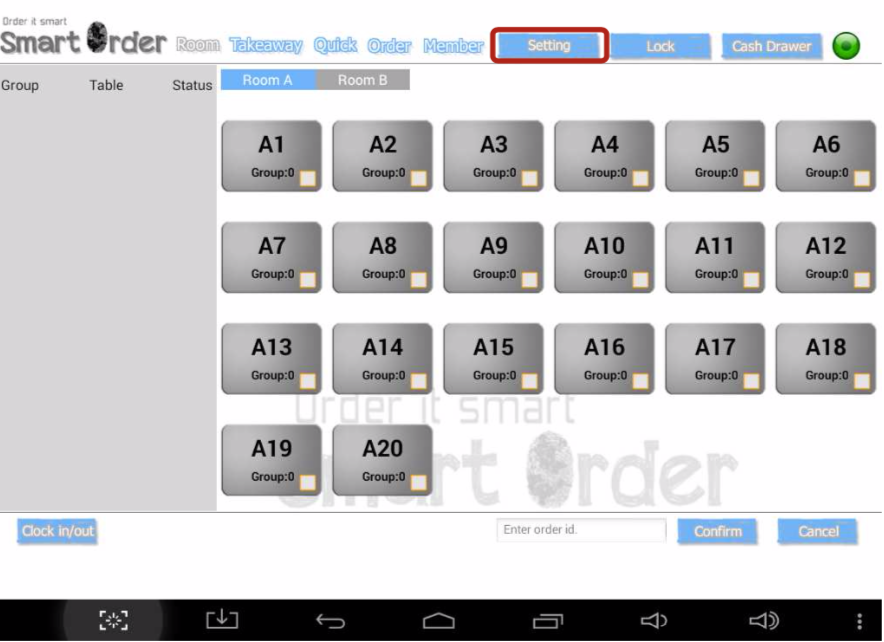
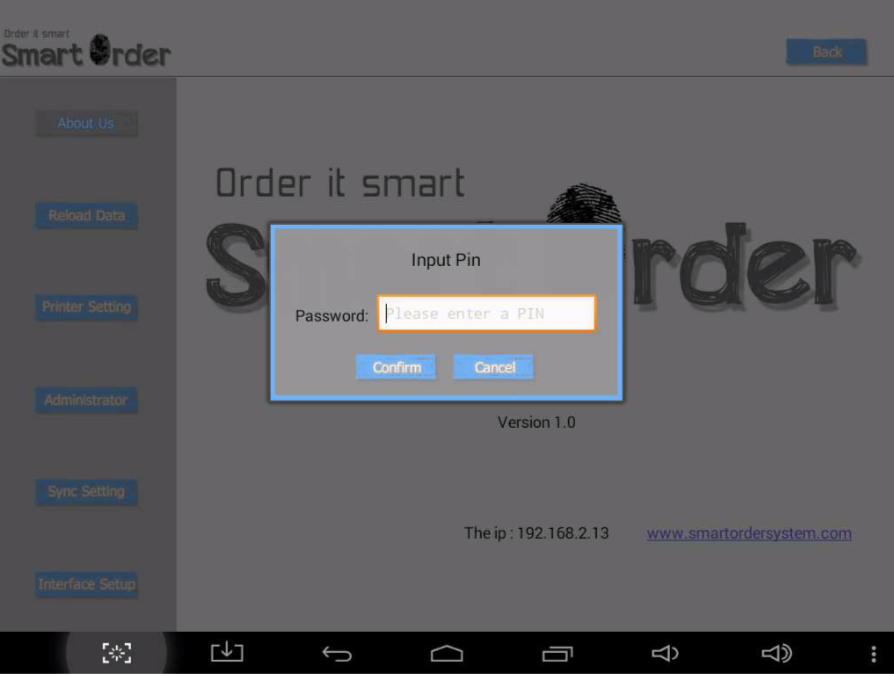
You need to enter PIN of manager (as set in E-Portal system) to enter the settings page.
Please press "Printer Setting" on the left. You will see the following screen.
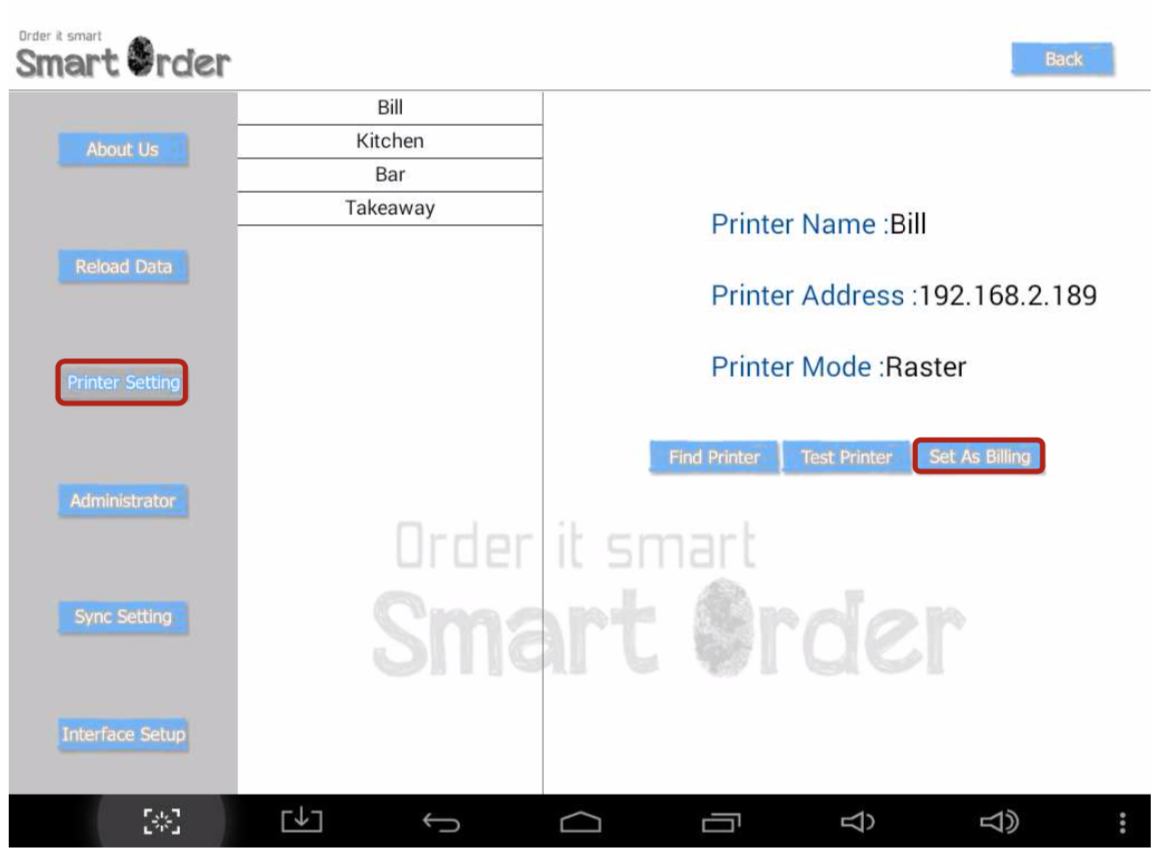
A billing printer is needed in order to print the bills. Please choose a printer and press "Set As Billing".
Printer Testing
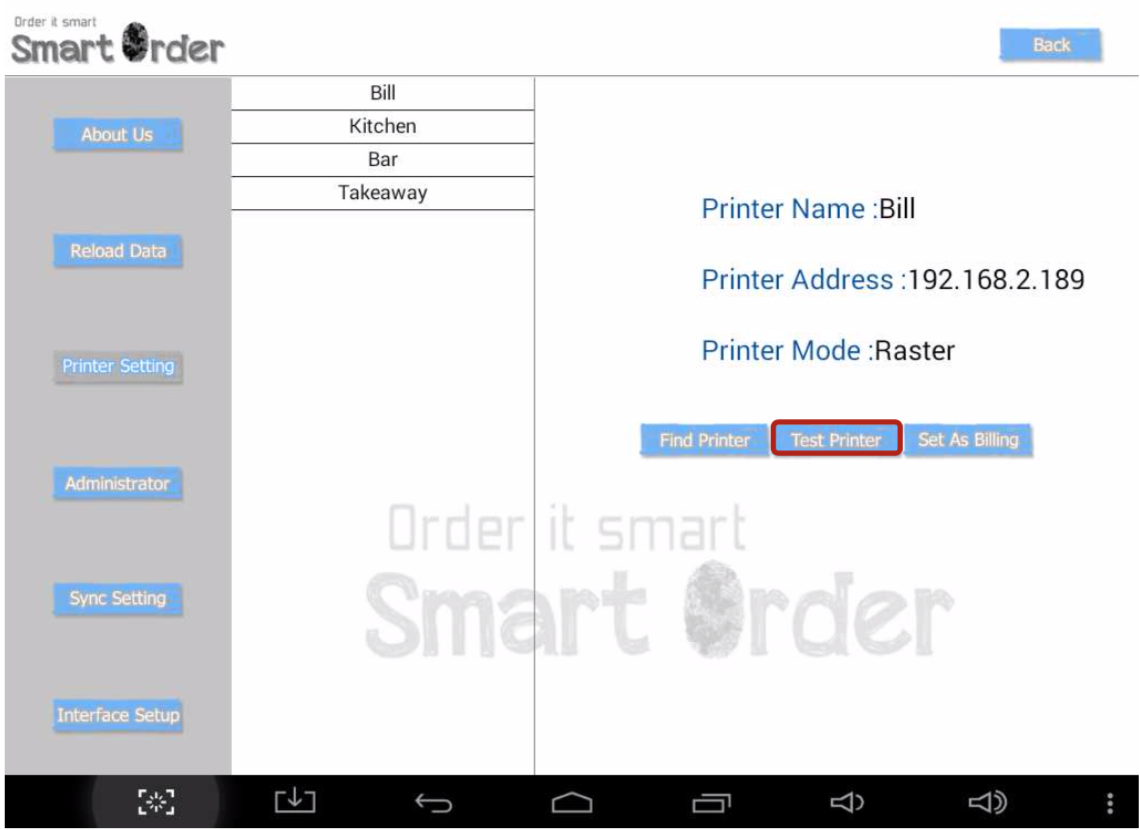
You can test your printers with a sample receipt by pressing the "Test Printer" button to print a sample reciept.
Data Synchronization and Automatic Data Uploading
By pressing "Sync Setting" in the settings page, you can enter the sync settings page.
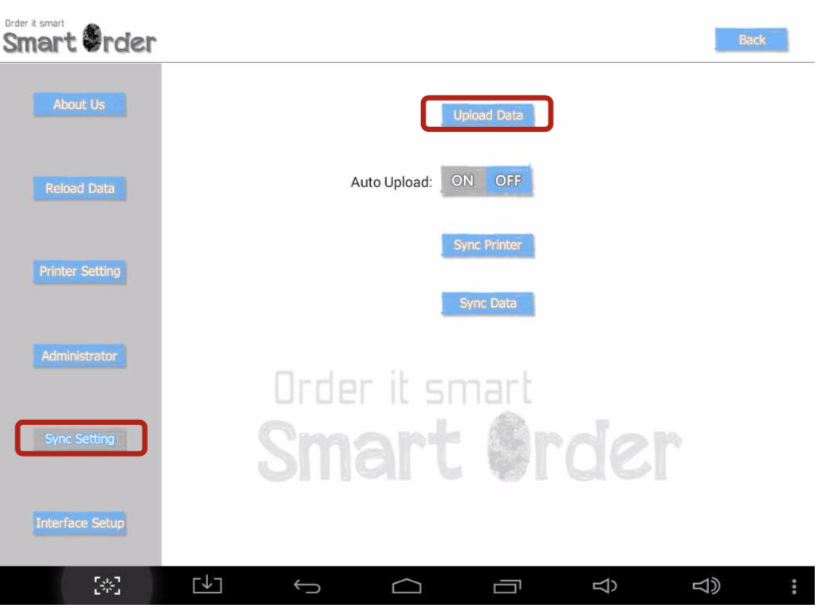
If you need to use Smart POS system off-line, please set the "Auto Upload" switch as shown in the above. Then all data will be stored locally. Also, you can press the "Upload Data" button to manually upload data to E-Portal system.
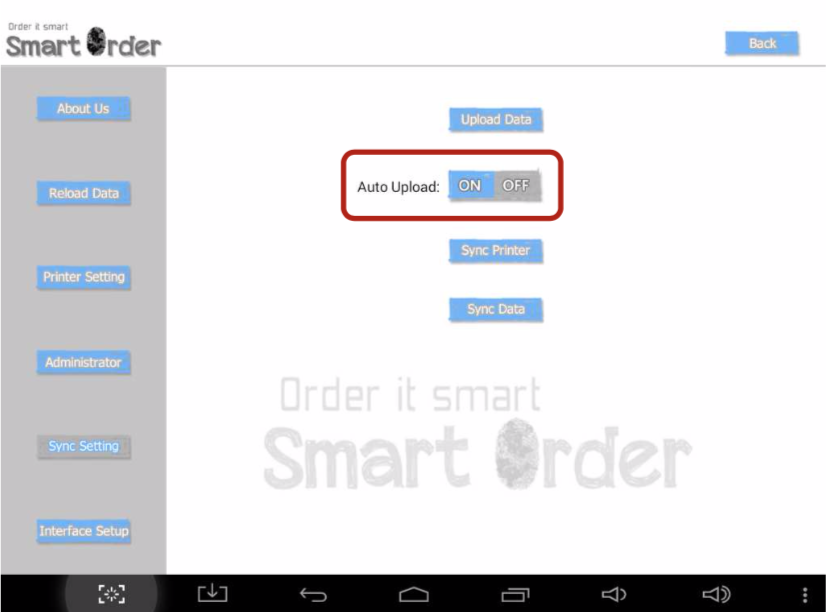
If you need to synchronize data with the cloud platform automatically, please press the switch of "Auto Upload" and please make sure the "ON" side is blue (same as the picture below).
If you need to synchronize data with the cloud platform automatically, please press the switch of "Auto Upload" and please make sure the "ON" side is blue (same as the picture below).
PIN Setting of Screen Lock
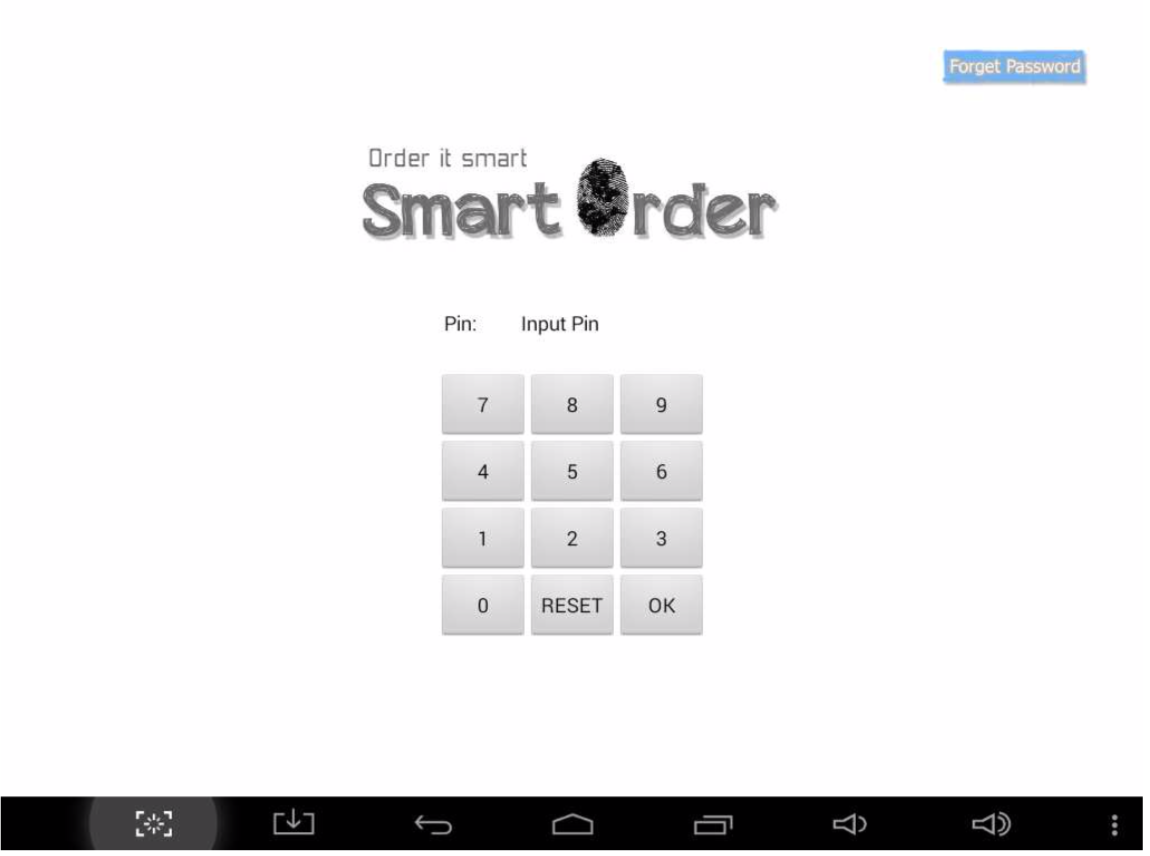
Smart POS supports screen lock to protect your POS system and prevent unauthorized use. The default PIN is "1234". Please enter the interface setup page to change this PIN.
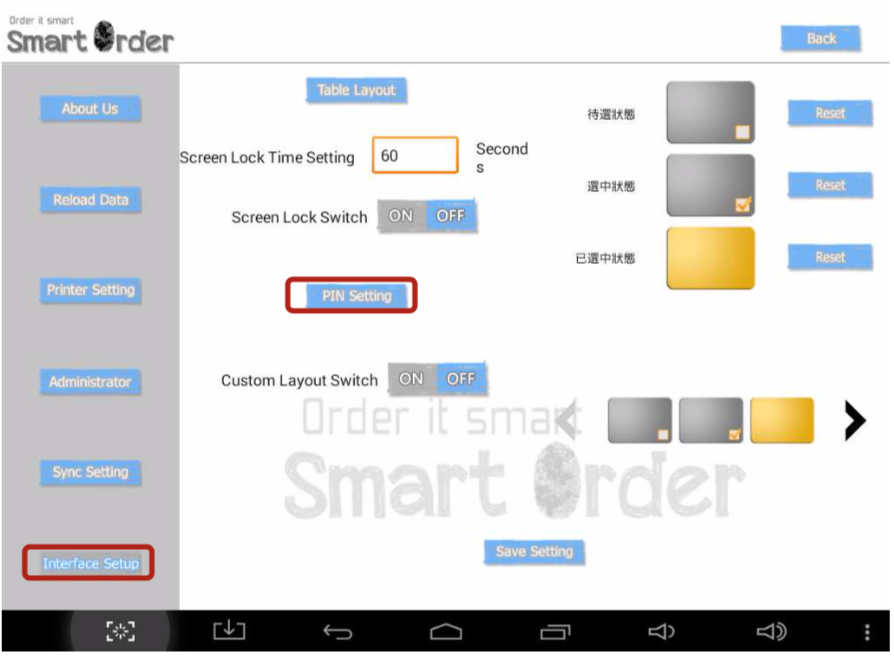
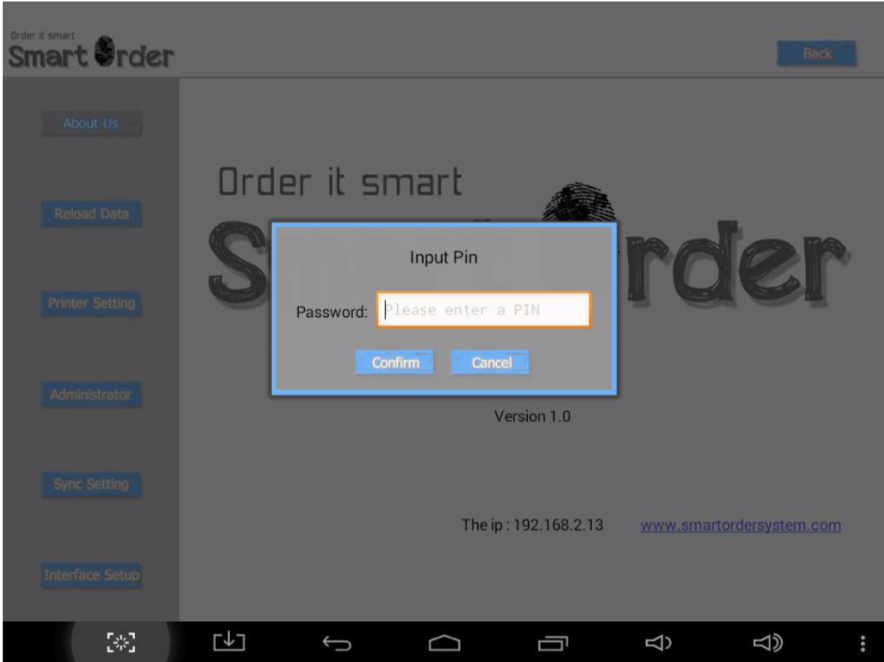
Press the "PIN setting" button, enter your new password, then press "Confirm".
Automatic Screen Lock Settings
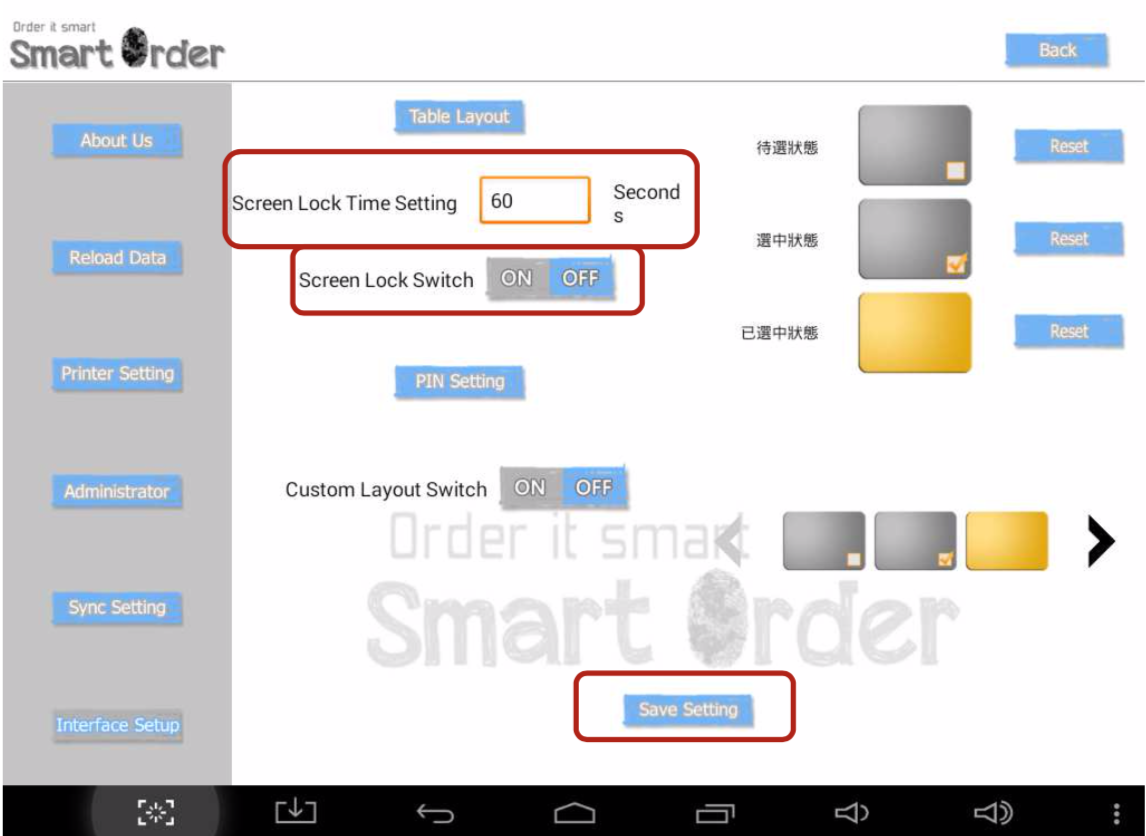
You may turn on the automatic lock function by switching the "Screen Lock Switch" on in order to protect your POS system. The system will be automatically locked if the idle time exceeds the limit. Also, you can modify the time limit in the "Screen Lock Time Setting" page. You need to press "Save Setting" after the configuration.
Start Using Smart POS
After configuration, Smart POS is ready for use. Below are demonstrations and tutorial of using Smart POS. You may also watch the tutorial videos in our website.
Customers Entering Restaurant
In this example, the operator needs to open a table, when new customers arrived.
Example A.
A table for two is requested.
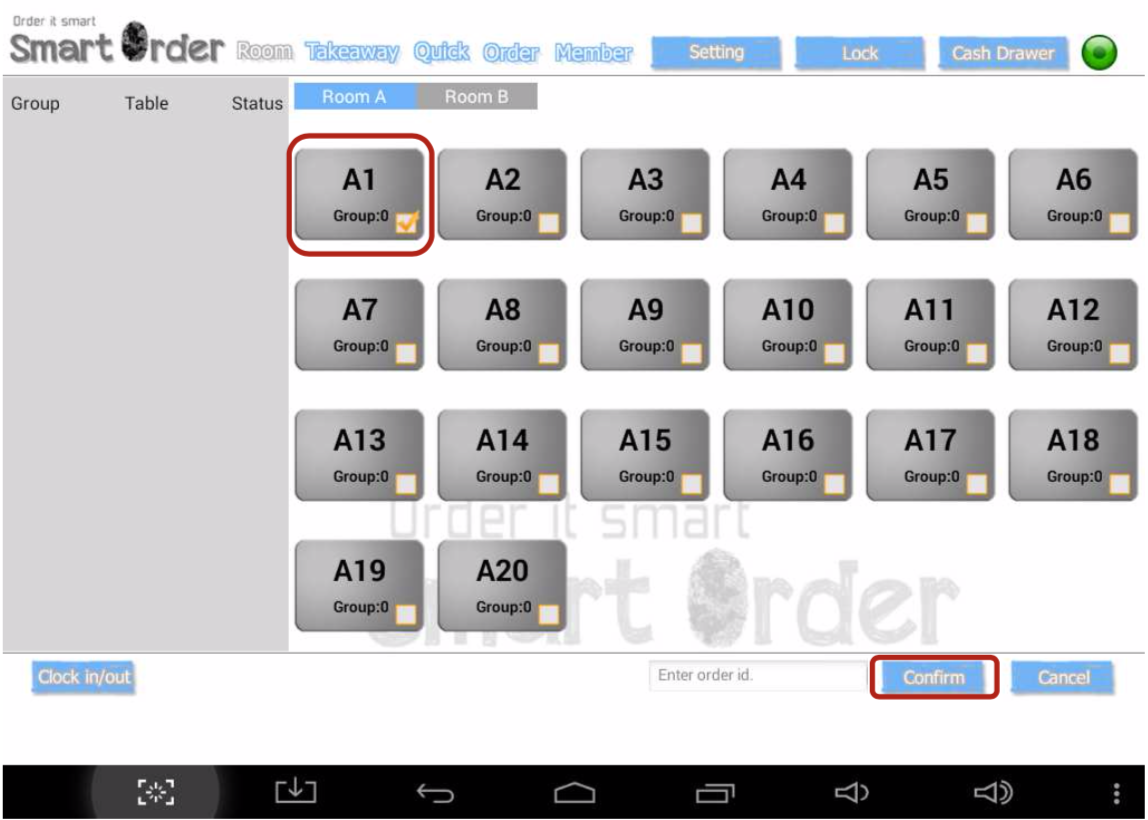
1) Press a empty table, and make sure the checkbox has a tick.
2) Press "Confirm" at bottom-right corner.
A table for two is requested.
1) Press a empty table, and make sure the checkbox has a tick.
2) Press "Confirm" at bottom-right corner.
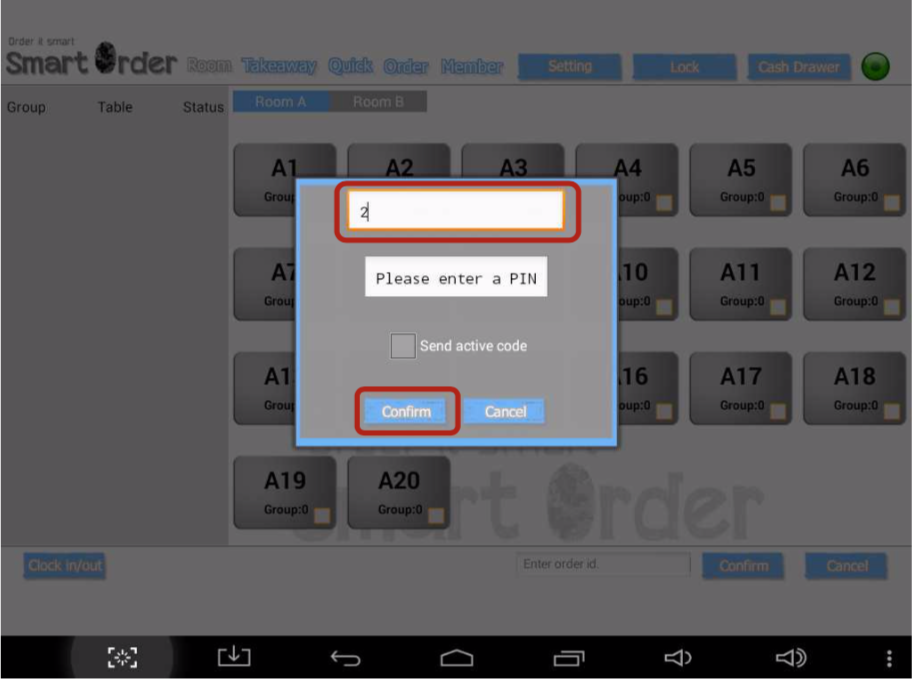
3)Enter the number of customers, which is "2" in this example. Then press "Confirm".
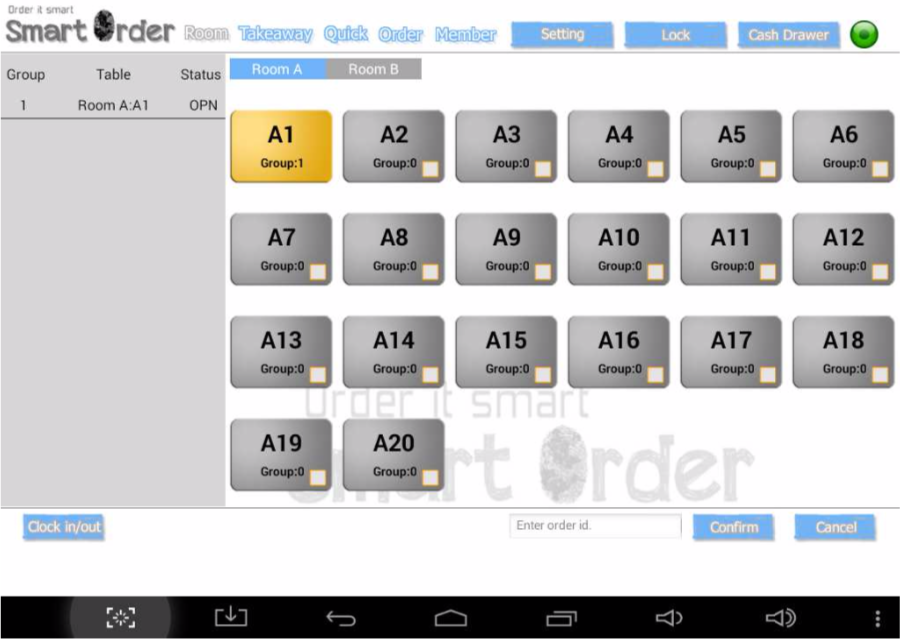
4)A successfully activated table would turn gold in colour.
Example B.
A table for six is requested, but the capacity of the largest table is just four.
1)Similar to Example A, you have to choose tables. But this time two tables are selected at the same time.
A table for six is requested, but the capacity of the largest table is just four.
1)Similar to Example A, you have to choose tables. But this time two tables are selected at the same time.
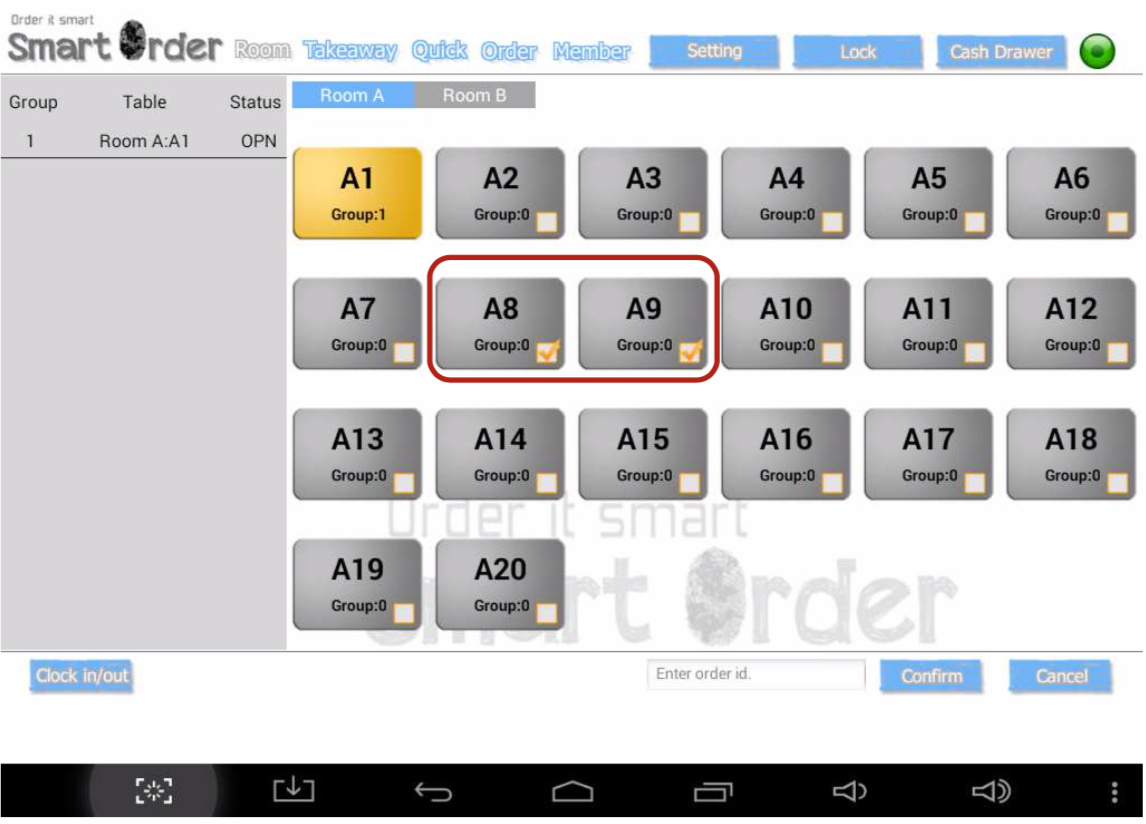
2)The procedure afterwards is same as Example A.
Placing Order
You need to enter the ordering page to place the order of your customers. First, press the table according to your customers table.
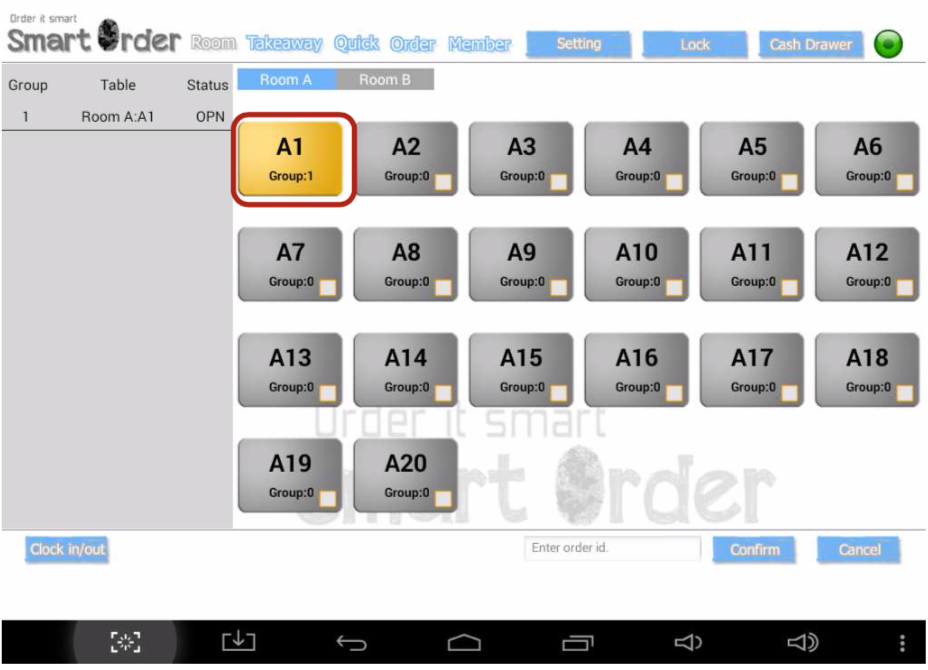
Then, you will enter the ordering page.
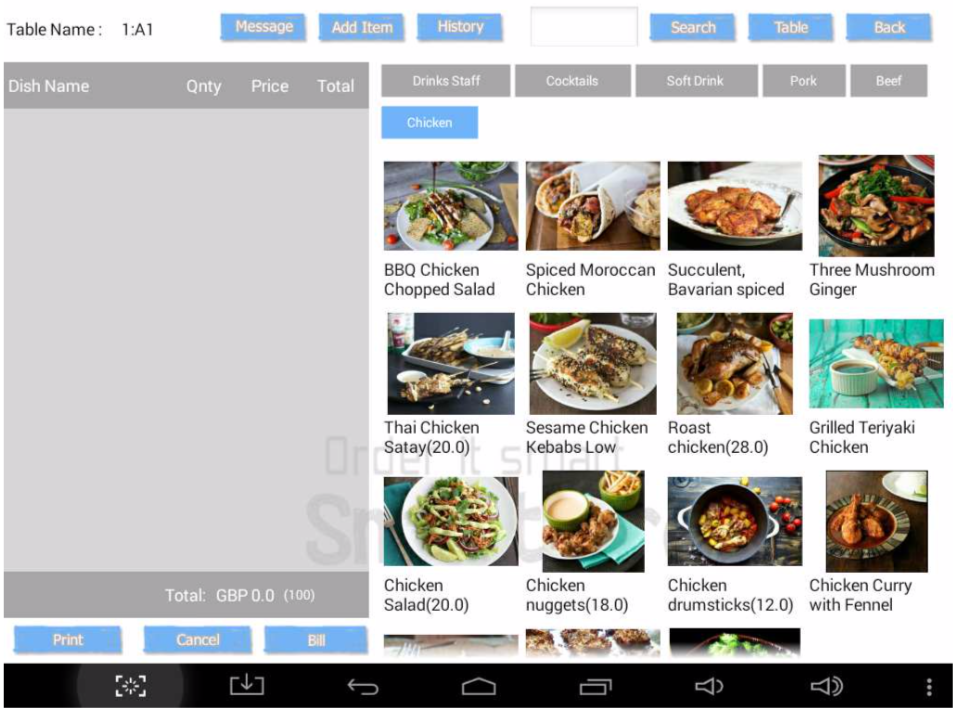
The categories you configured in the E-Portal is on the top. Please select a category first.
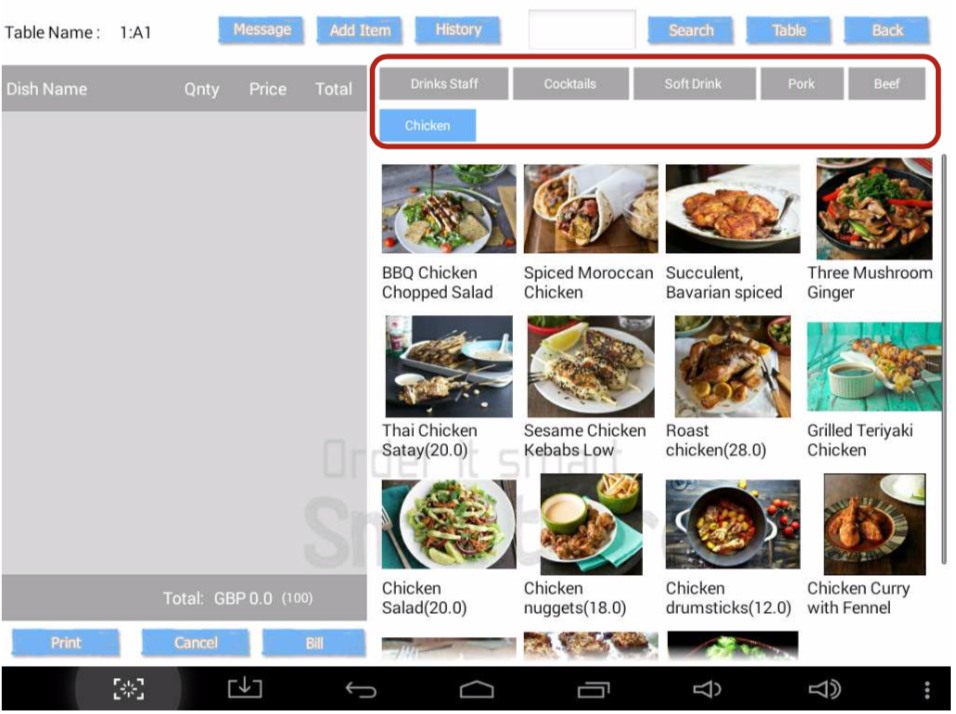
Please press the photo of the dish to enter the dish page. There are information of the dish, dish modifiers and additional notes. After completing the dish options, you can place the order by pressing the "Confirm" button.
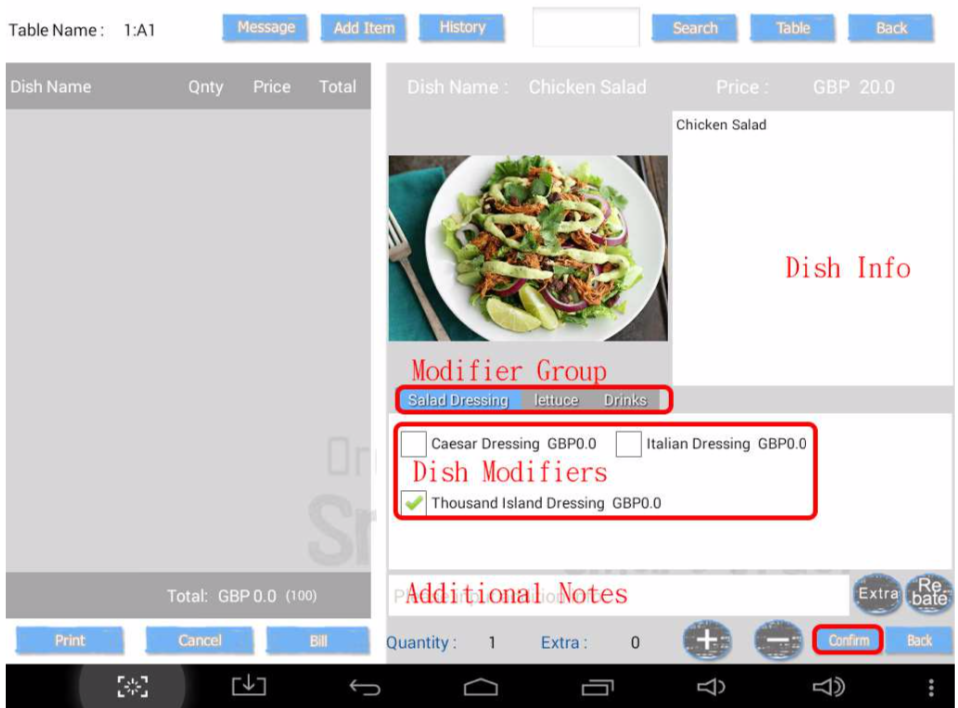
When an order is placed, the list on the left will be updated.
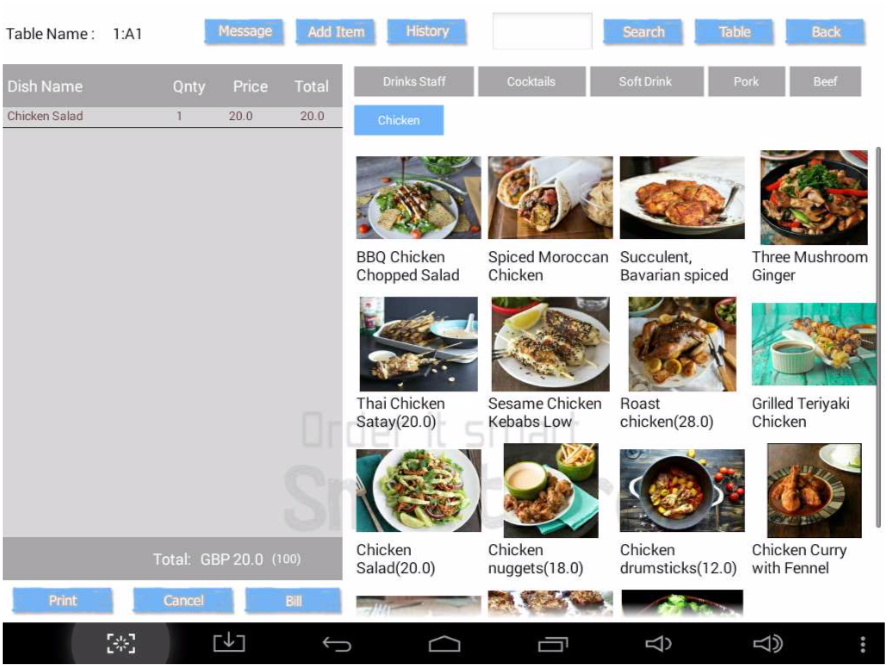
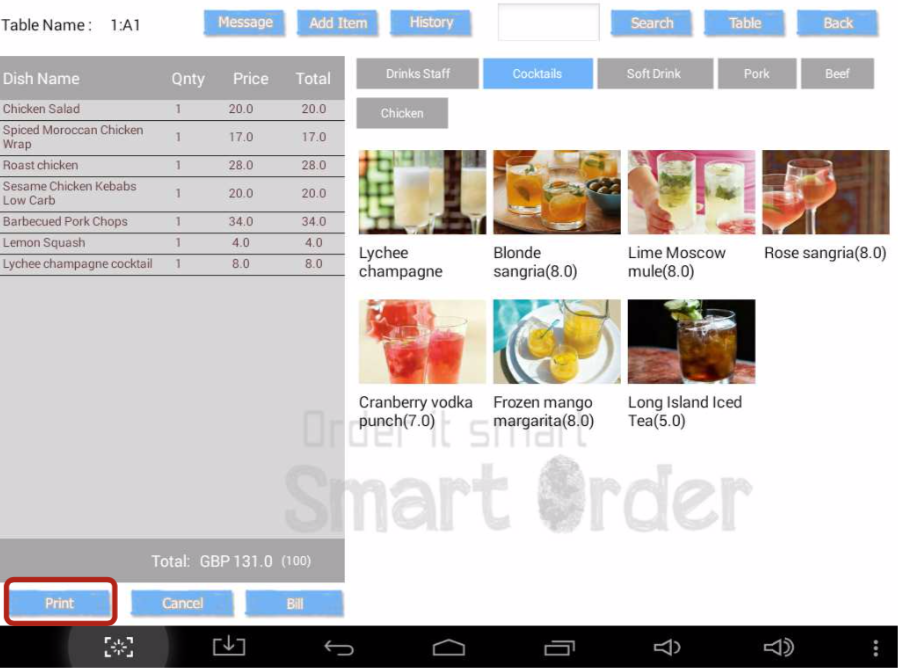
Please place the orders of dishes one by one. After placing all the dish orders, you may press the "Print" button at the bottom left corner.
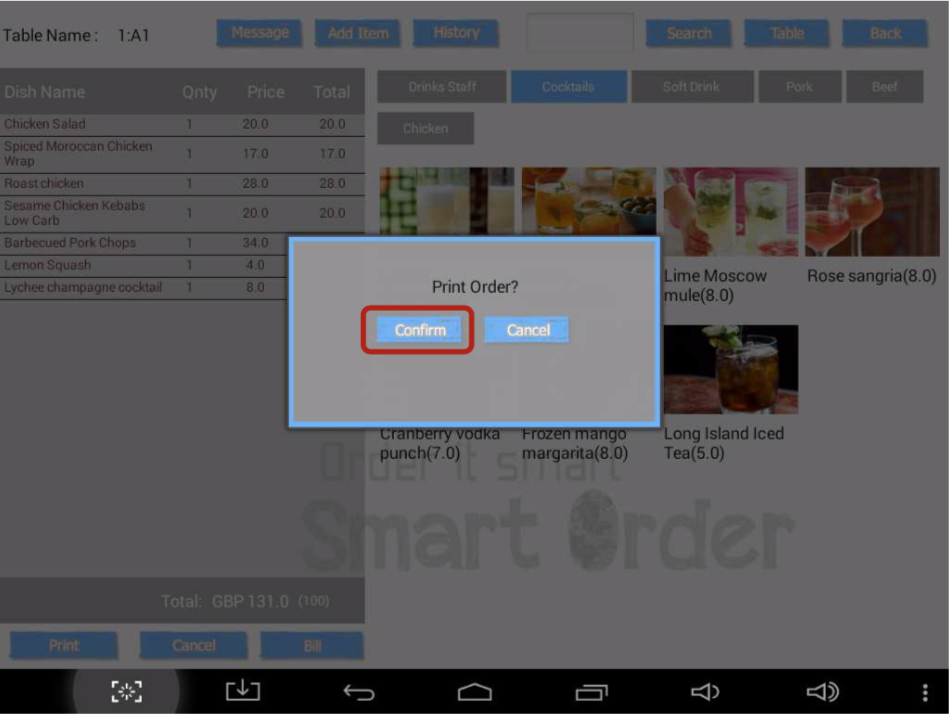
Press "Confirm" in the pop-up window. This will send your order to the corresponding printers. In this example, the food will be sent to the kitchen printer and the drinks will be sent to the bar printer.
Adding Dishes Not Listed in Menu
If the customer wants a dish which is not listed in the menu, you can use this function to temporarily add a dish. Press the "Add Dish" button to trigger this function.
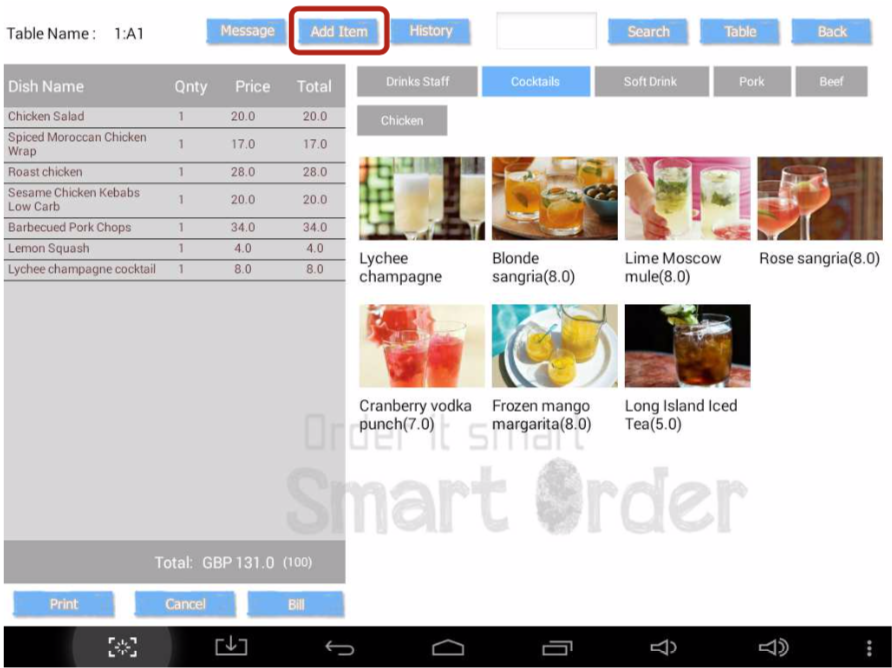
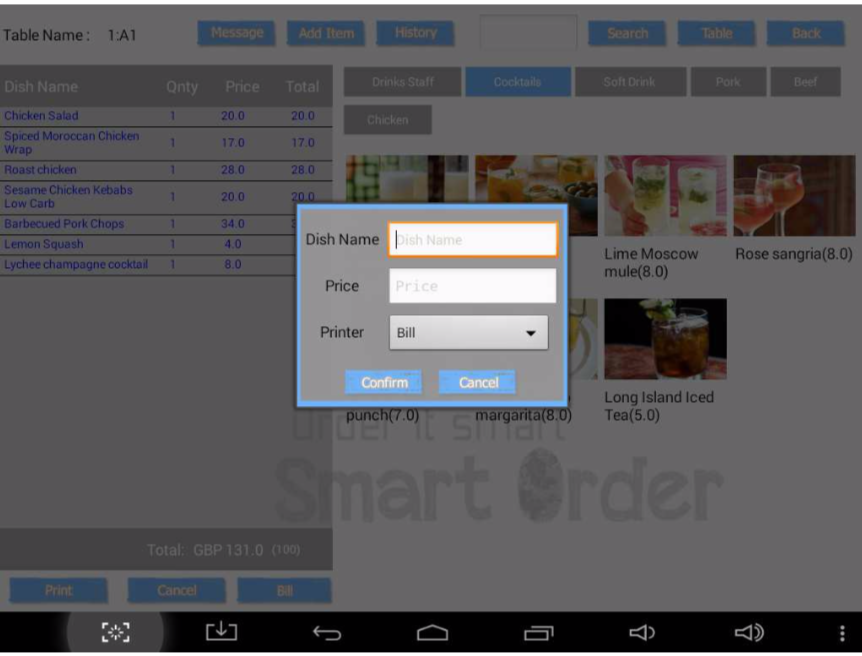
In the pop-up dialog window, enter the name, the price and the corresponding printer of the dish, then press "Confirm".
Additional Orders
When you have placed and printed your customer's order, the order is defined as printed. If the customer requests to add new dishes, you just have to place orders as the same as before. In the following example, Sous Vide Thai Beef Cheek Noodle Salad and Beef Sliders with homemade Chimchuri Sauce are newly added.
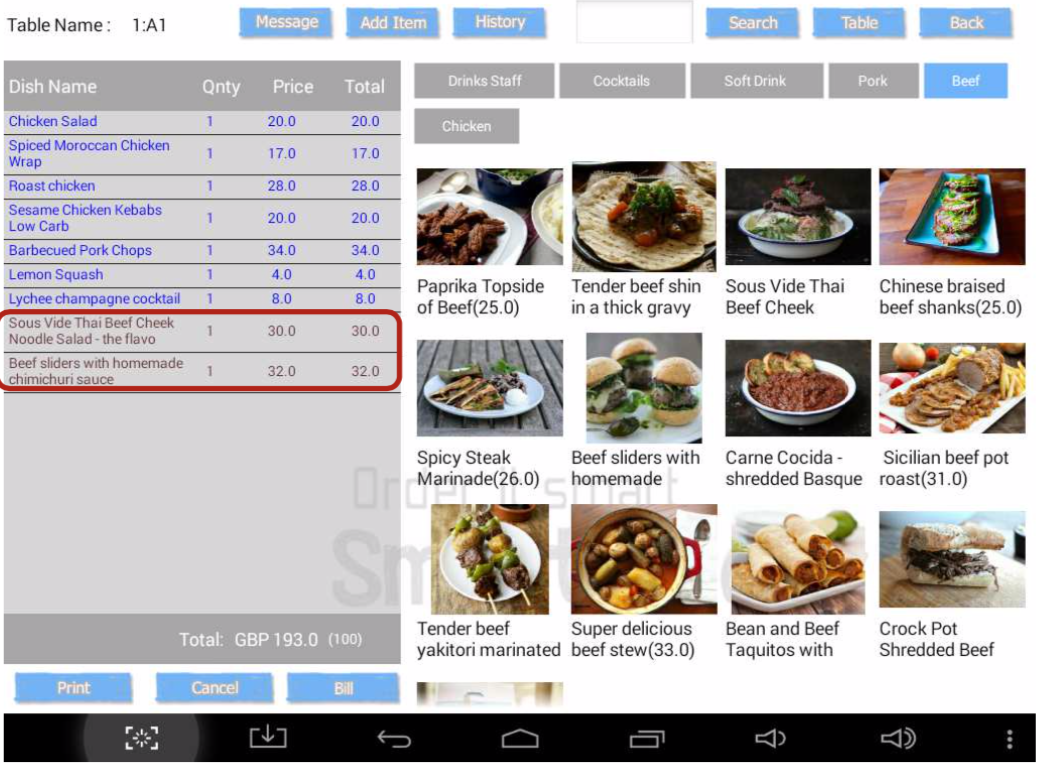
Press "Print" again. The following pop-up window will appear.
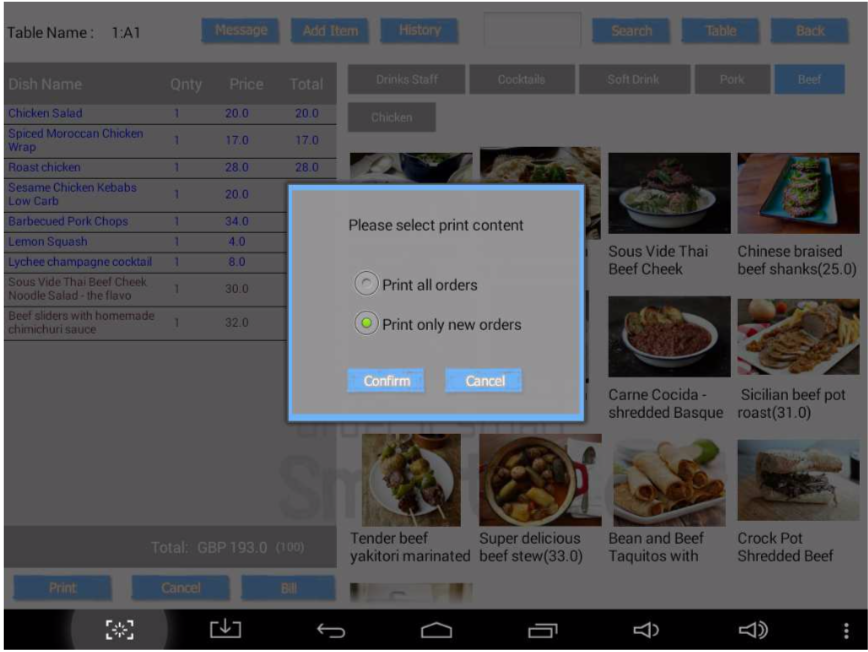
Print all orders - Print all the orders including all previously printed orders
Print only new orders - Only print orders which are not printed before.
Print only new orders - Only print orders which are not printed before.
Marking Dishes as Delivered
Press and hold the dish name on the list for about one second.
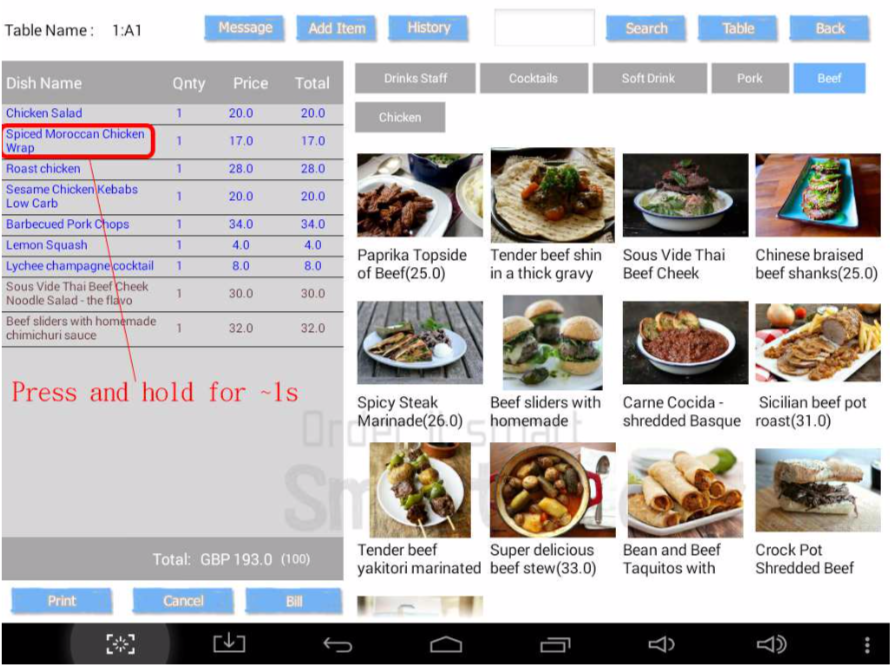
The following windows will pop up. Press "Dish Delivered".
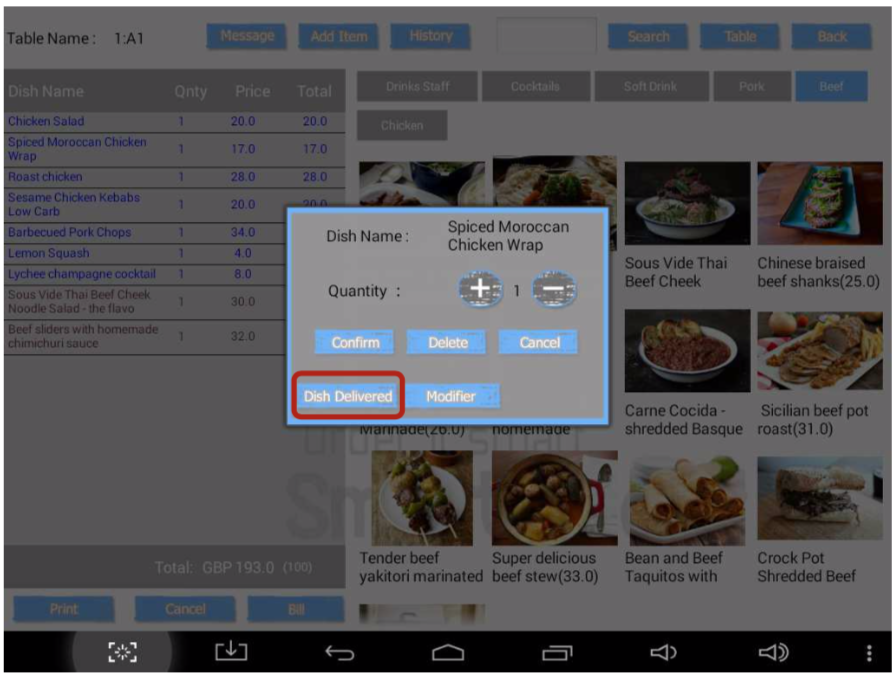
A delivered dish will be shown in red colour in the list.
Editing or Deleting Dishes
Press and hold the dish name on the list for about one second. Edit the quantity in the pop-up window or press "modifier" to edit the modifiers.
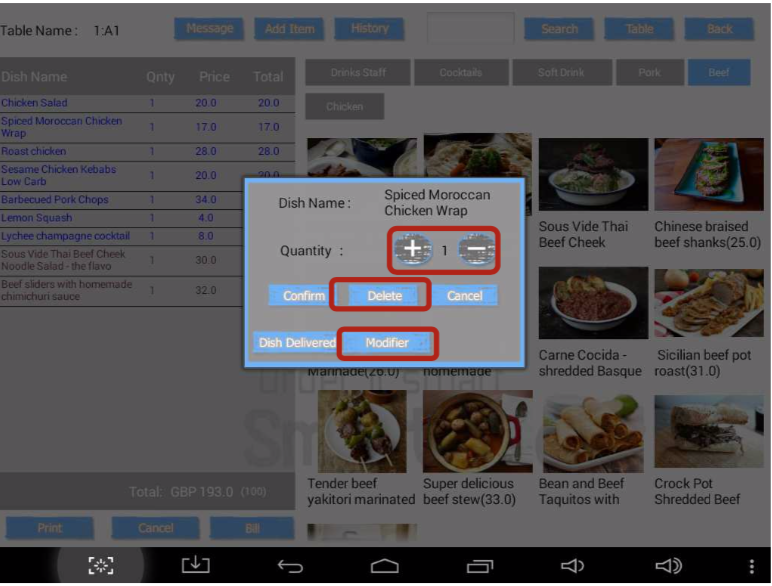
We do not recommend user to edit the quantity of the dish, only if your orders have not yet printed. For example, if you tookcustomer orders entered the quantity incorrectly, you can use this function to edit the quantity and print it out later. However, for orders that have been printed before, you will be able to print this as a new order only.
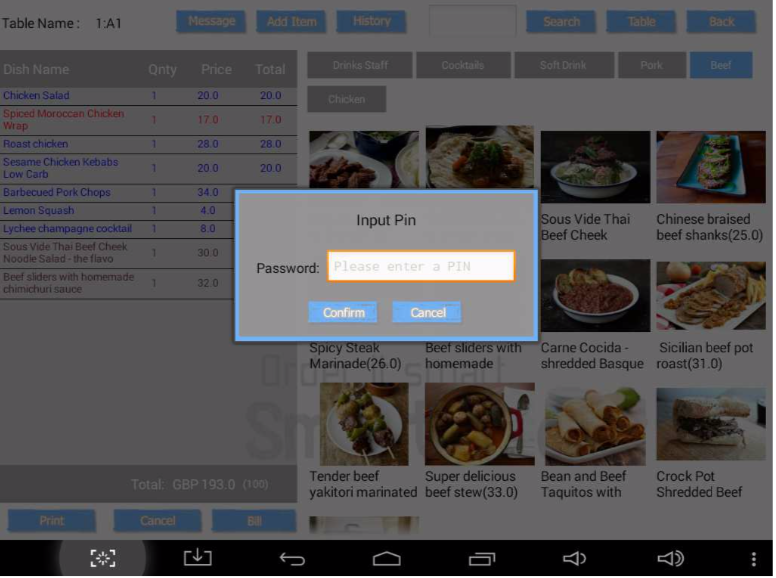
To delete a dish, just press "delete". You need to enter a PIN of a manager to do this.
To delete a dish, just press "delete". You need to enter a PIN of a manager to do this.
Cancelling dishes or Refund
These two functions are applicable to dishes marked as "delivered" only. Press and hold a delivered dish again and the following window will appear. Please choose a reason.
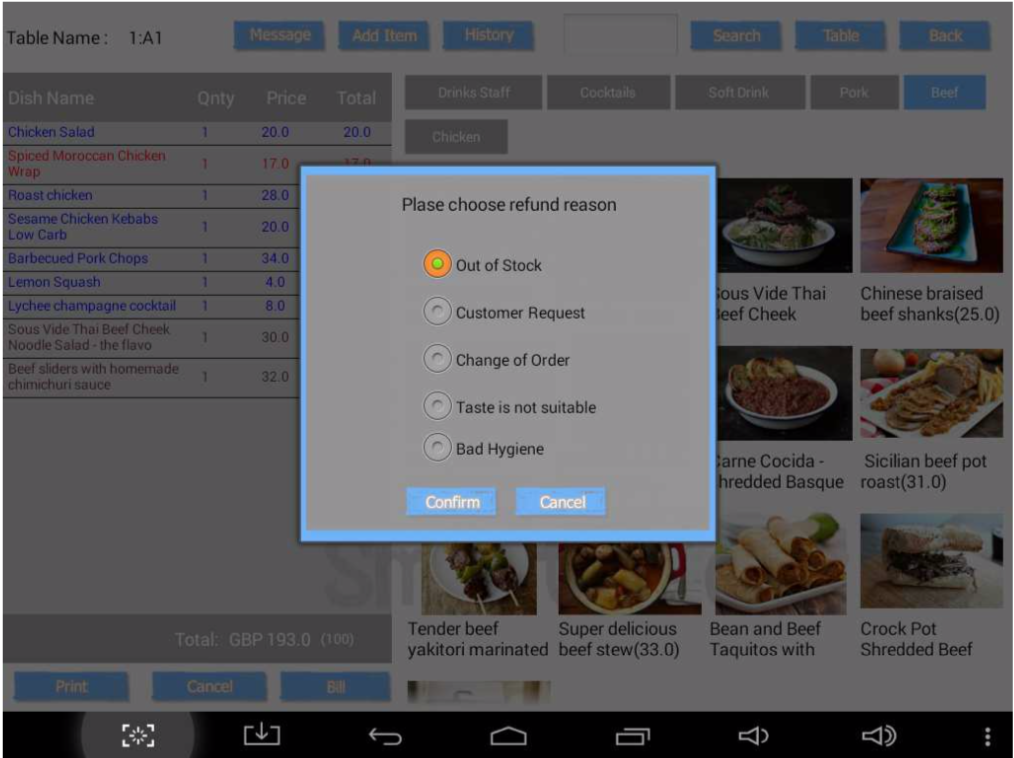
All cancelled and refunded dishes will be counted as voided items in the Sales Summary Report. Users can then count the loss due to cancelled and refunded dishes.
Message Printing
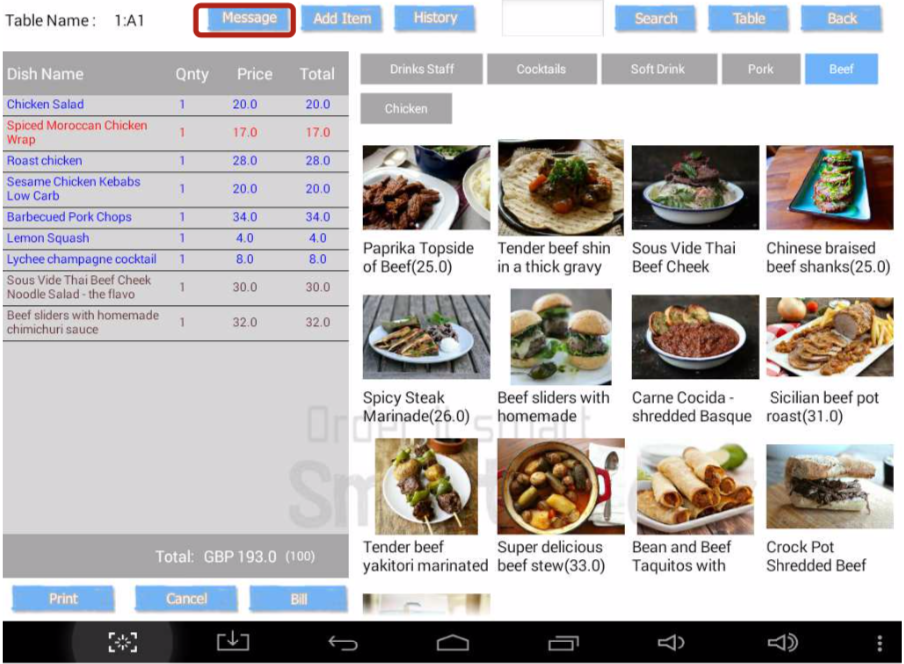
You may need to send messages like "Fire Main" to the kitchen. You can press the "Message" button in the ordering page to send such messages.
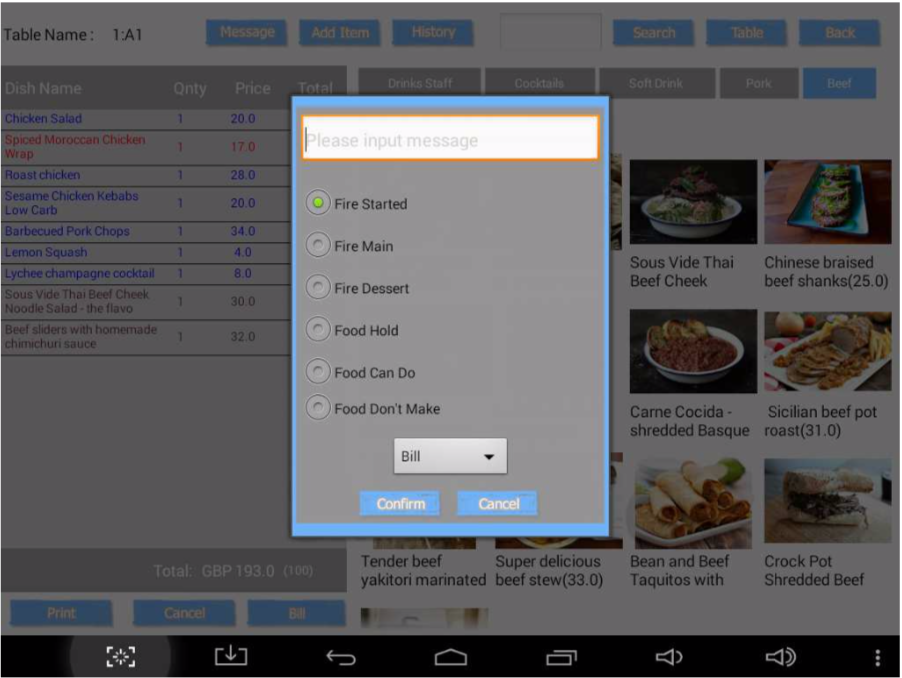
You can choose from the preset messages or enter one by yourself. Please choose the printer that you want to send message to and press "Corfirm"
Changing Table
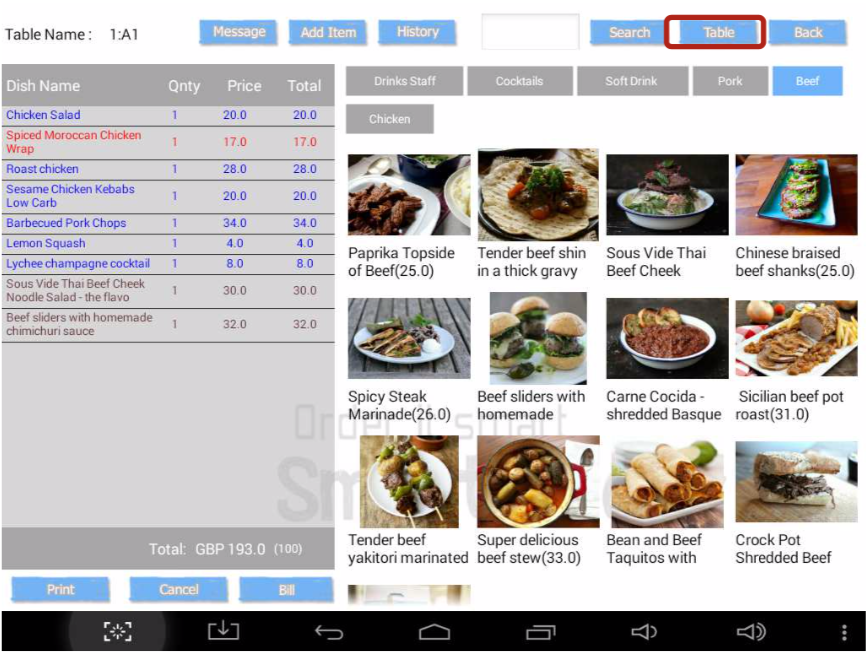
Sometimes, you might need to change the table of your customers. In this example, we will show you the procedure of changing table A1 to A8.
First, you need to initialize table A8 (please refer to Pages 14 to 16).
First, you need to initialize table A8 (please refer to Pages 14 to 16).
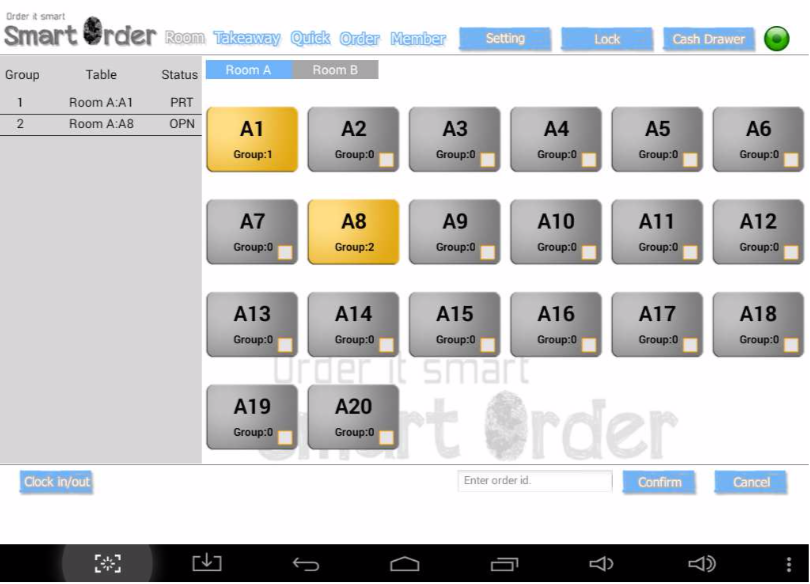
Press the table A1, then press the "Table" button at the top right hand corner.
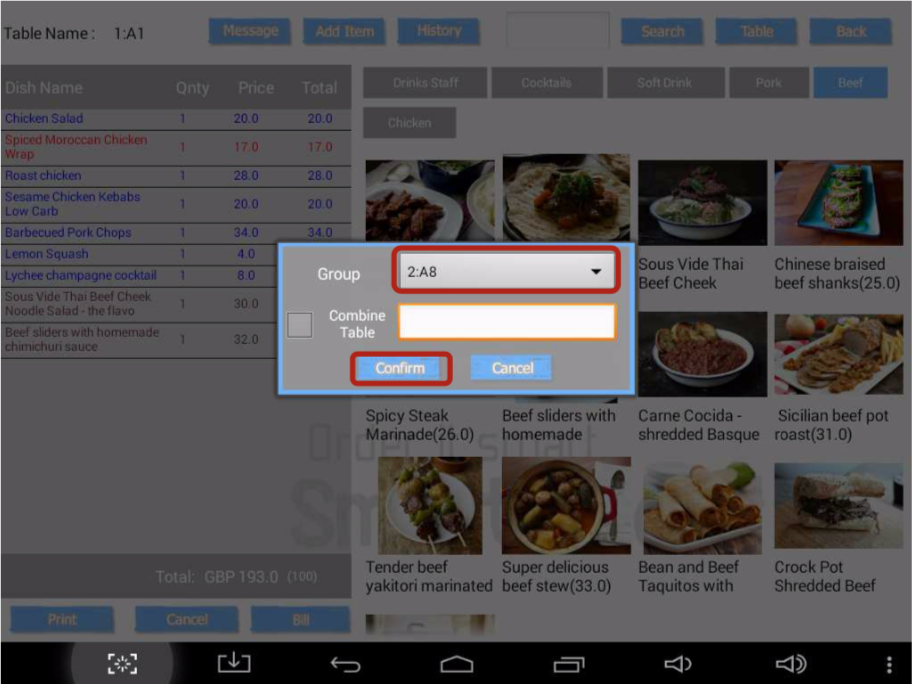
Select table A8, then press "Confirm". The table changing process is now completed.
Combining Tables (and Orders)
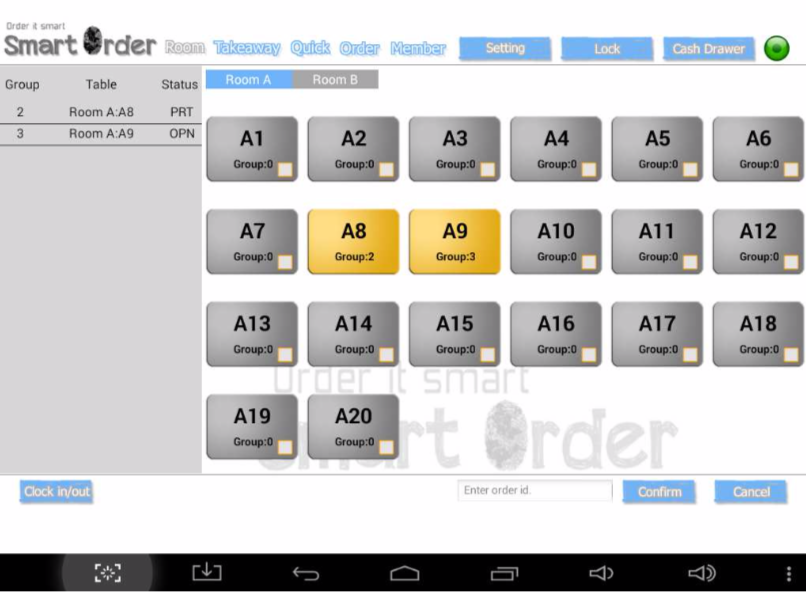
You may sometimes need to combine your customers' tables' into one. In this example, we will show you how to combine tables A8 and A9.
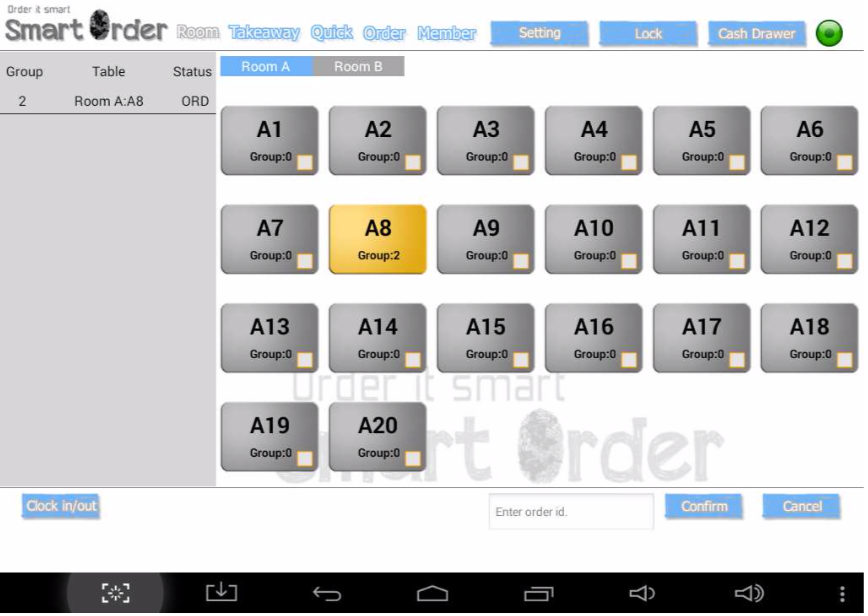
As shown below, both of the tables are activated. If the customers want table A9 to be combined to A8, please remember the group number of A9 first. In this example, the group number of table A9 is "3".
As shown below, both of the tables are activated. If the customers want table A9 to be combined to A8, please remember the group number of A9 first. In this example, the group number of table A9 is "3".
Select table A8, then press the "Table" button. Check the "Combine Table" box and enter the group number (3 in this case). Then press "Confirm".
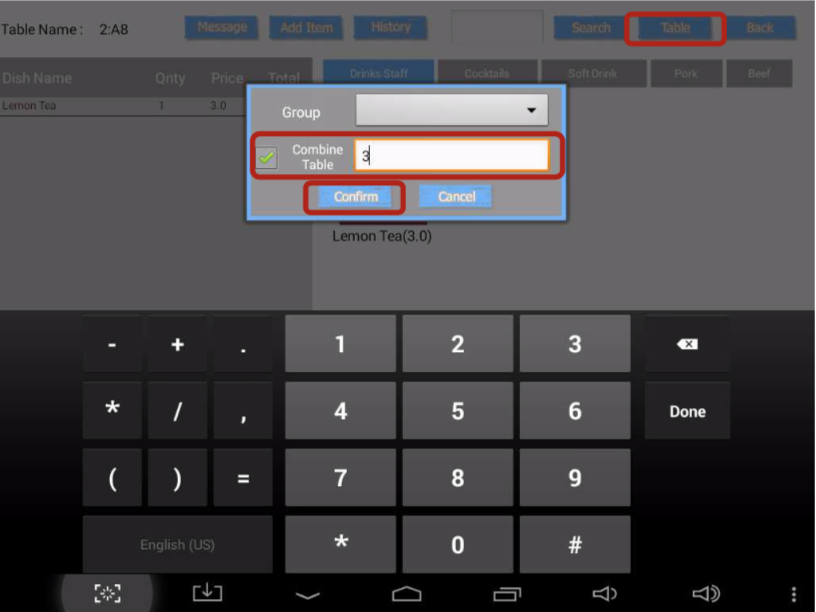
The tables are now combined.
Cancelling Orders
If your customer decided to leave the restaurant, or because of some other reasons, you may cancel the order by pressing "Cancel" on the ordering page.
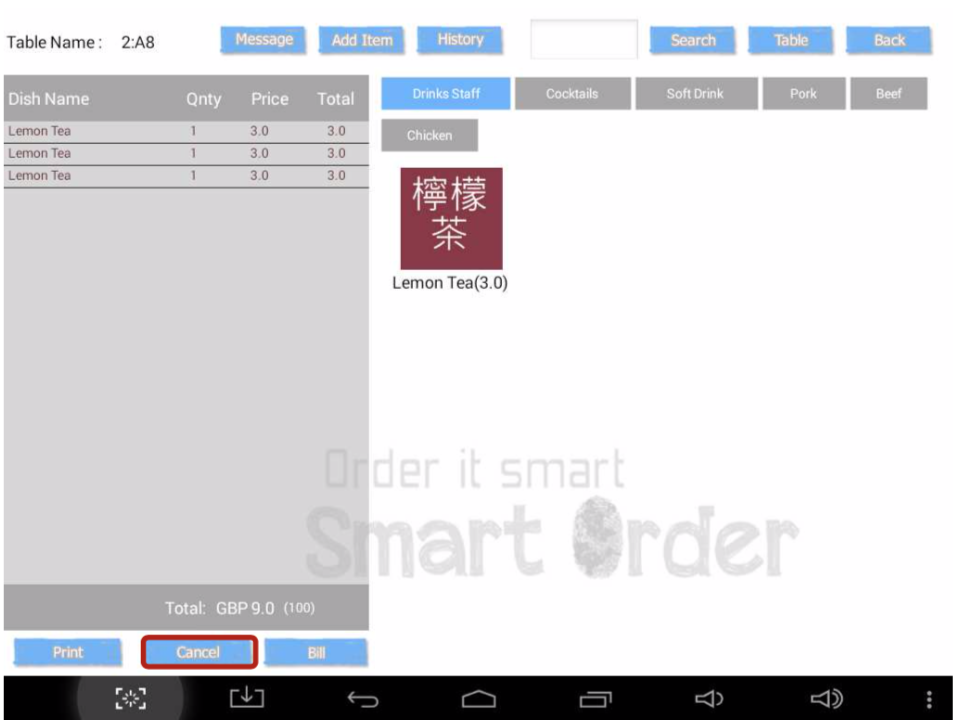
You will be asking for a manager's password. By entering the password and press "Confirm", you can have your customer's WHOLE order be cancelled.
Take away
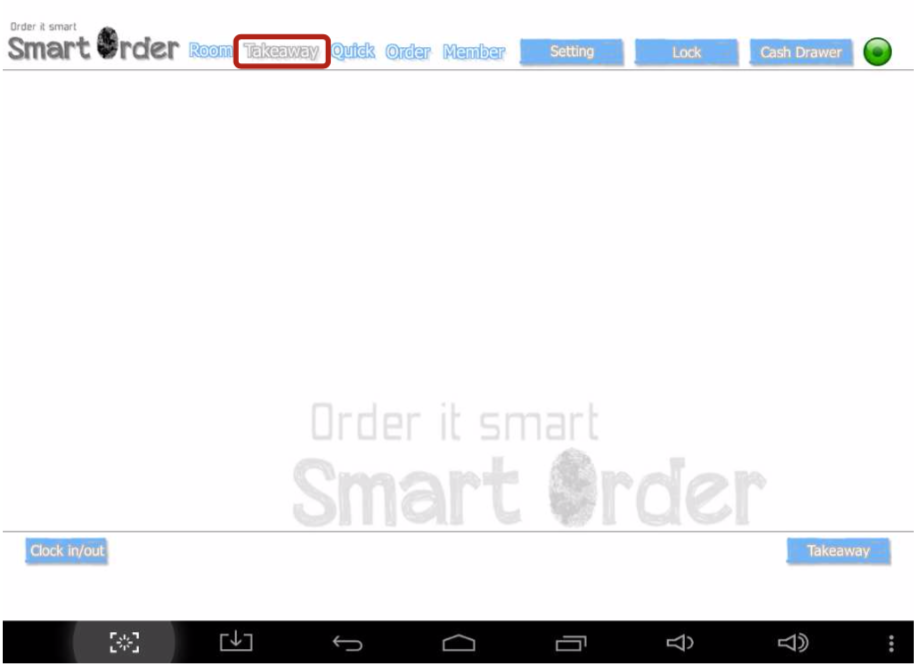
If a take-away order is received, you may input it by the "Takeaway" function. Press "Takeaway" in the main screen.
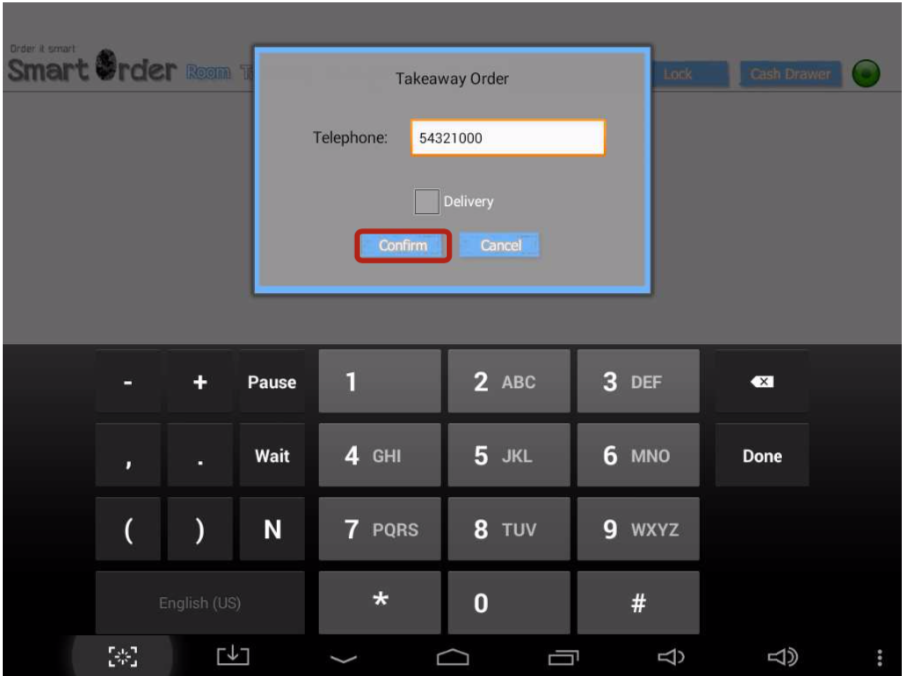
Enter your customer's information, and press "Confirm".
Press the take away order to place orders.
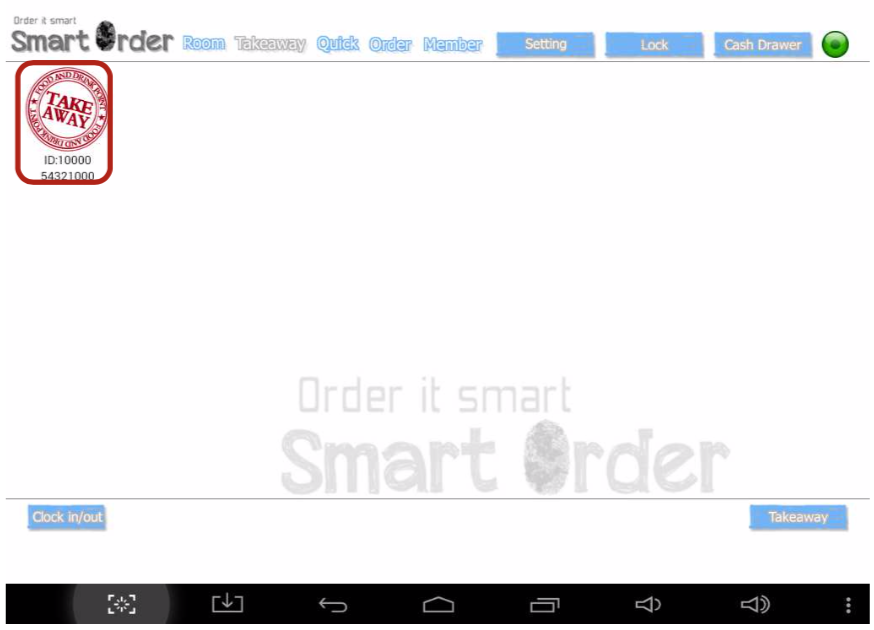
You will enter the ordering page. The following ordering steps are same as before.
Quick Ordering
Smart POS provides "Quick Ordering" which is suitable for fast-food or bars that your customers will take the ordered food by themselves. Please press "Quick" in the main page.
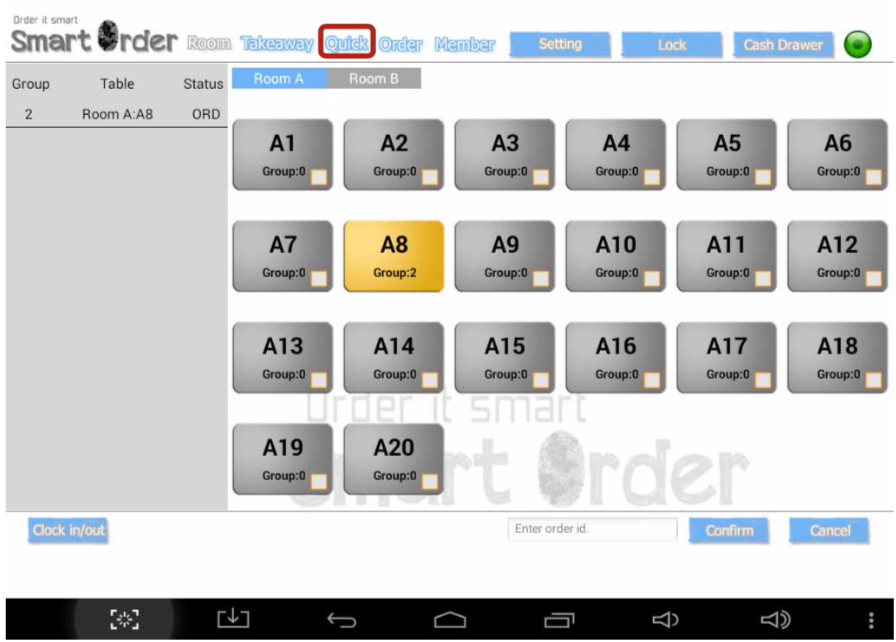
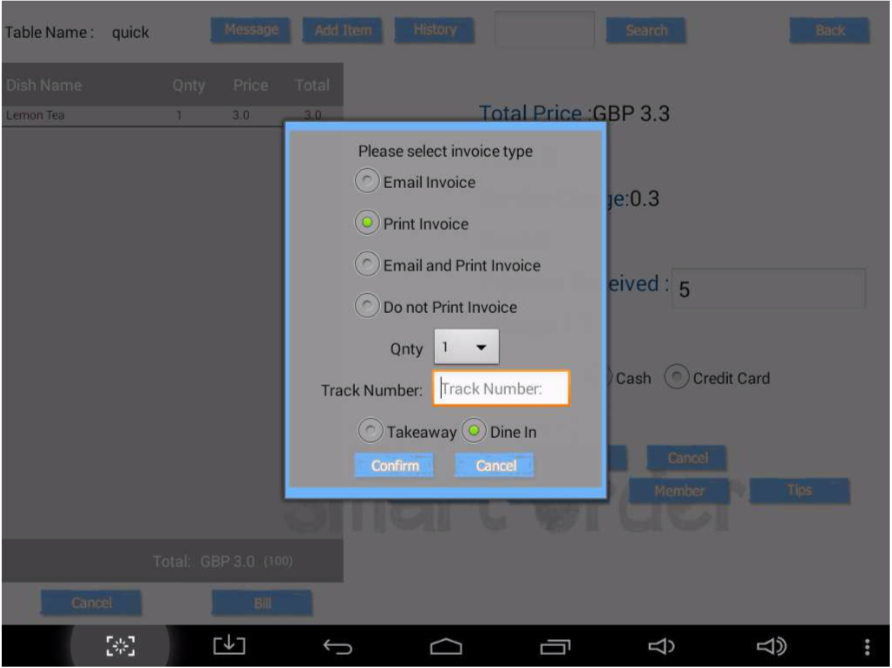
You will enter the ordering page and the ordering steps are just the same. Quick ordering can provide track numbers which eases the process of taking ordered food and drinks.
Voucher
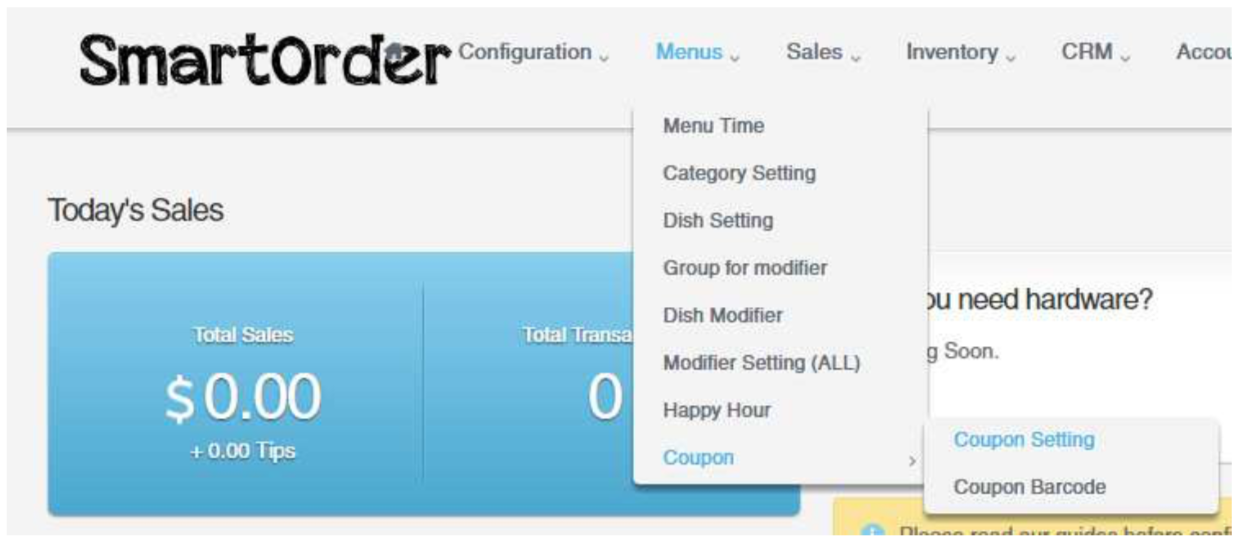
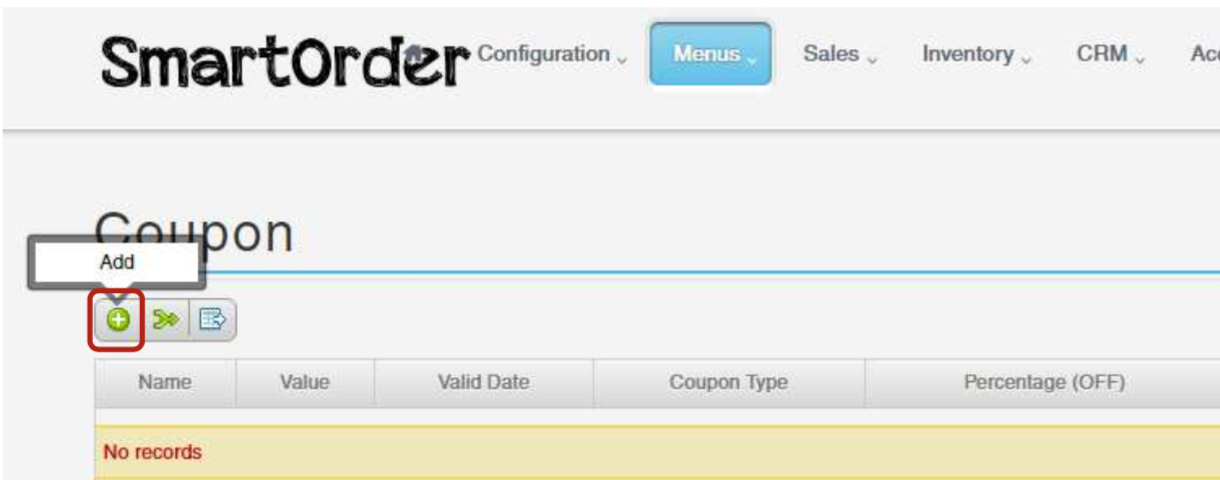
To create a discount/ gift voucher, you need to use the SmartOrder E-Portal System. Please select "Coupon Setting" in "Coupon" of "Menus".
Click the "+" button to add a coupon.
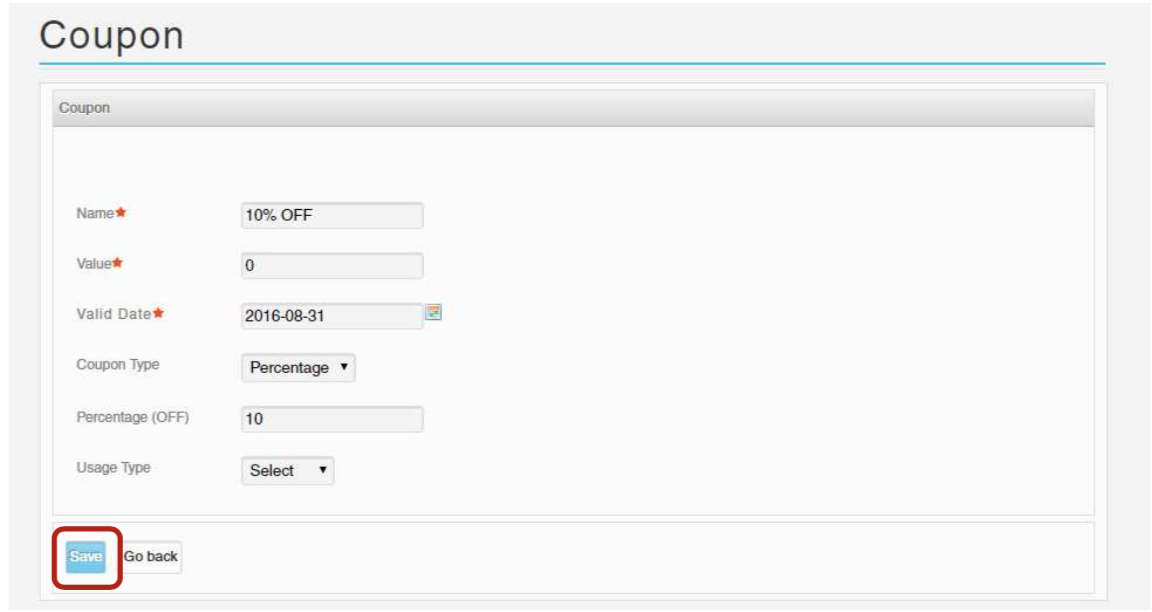
Please enter the name, value and due date of the coupon. If the coupon is a gift voucher or a cash coupon, please select "Value" in Coupon Type. If it is a percentage discount coupon, please select "Percentage" and enter the discount percentage in "Percentage (OFF)" For example, please enter "20" for a 20% off. 。When all fields are completed, please click "Save".
Discount and surcharge
Discount for whole bill
Please refer to Page 43.
Discount or surcharge for a single dish
You may apply "Extra" or "Surcharge" by pressing "Extra" or "Rebate".
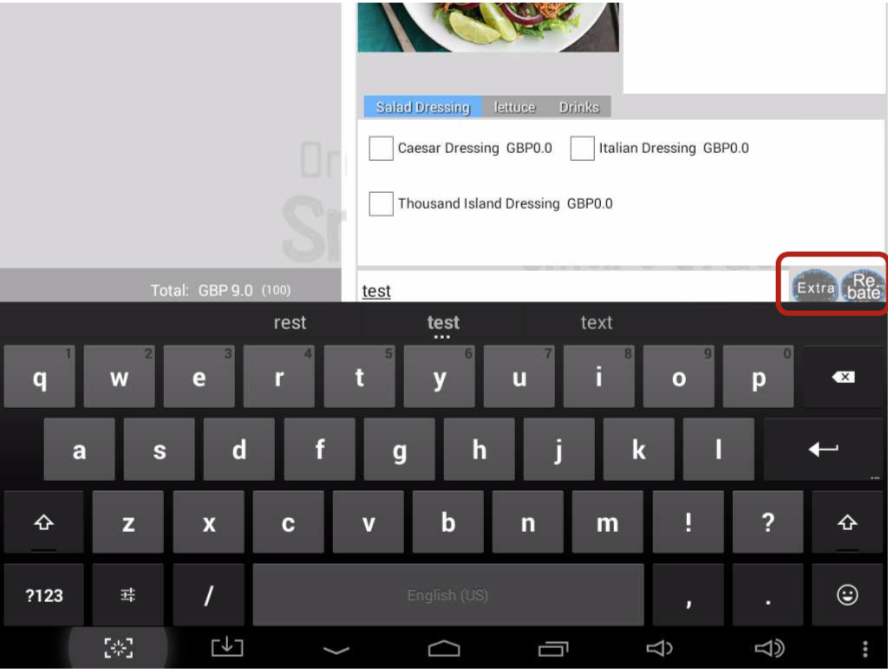
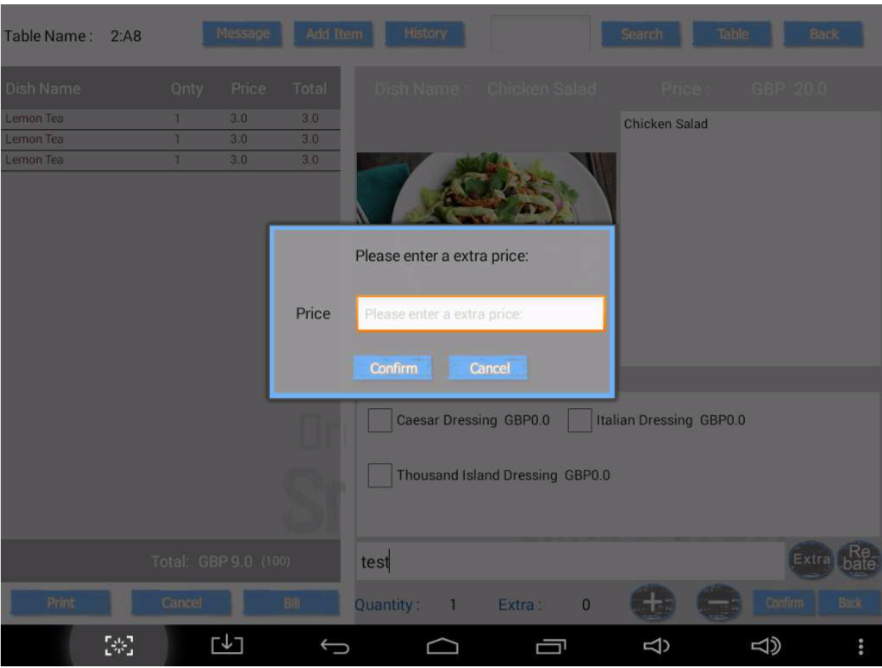
Press "Extra" for applying surcharge. Enter the extra price and press "Confirm".
Press "Rebate" for applying discount. You need to enter PIN for applying discount.
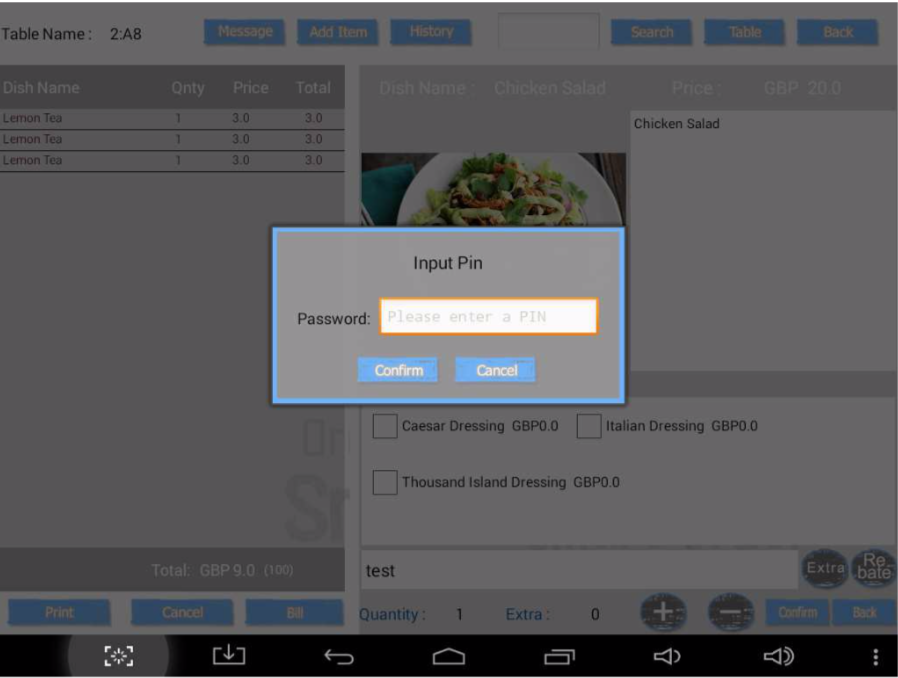
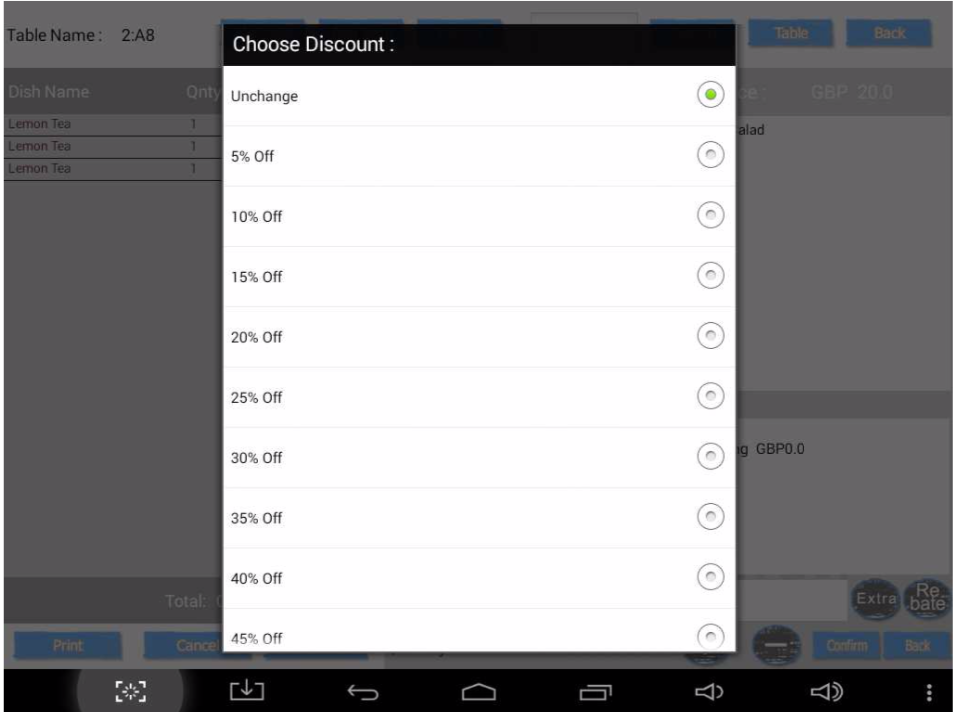
After entering the PIN, you can choose the discount percentage. The default options are multiples of 5% off. If you need other options, please contact us.
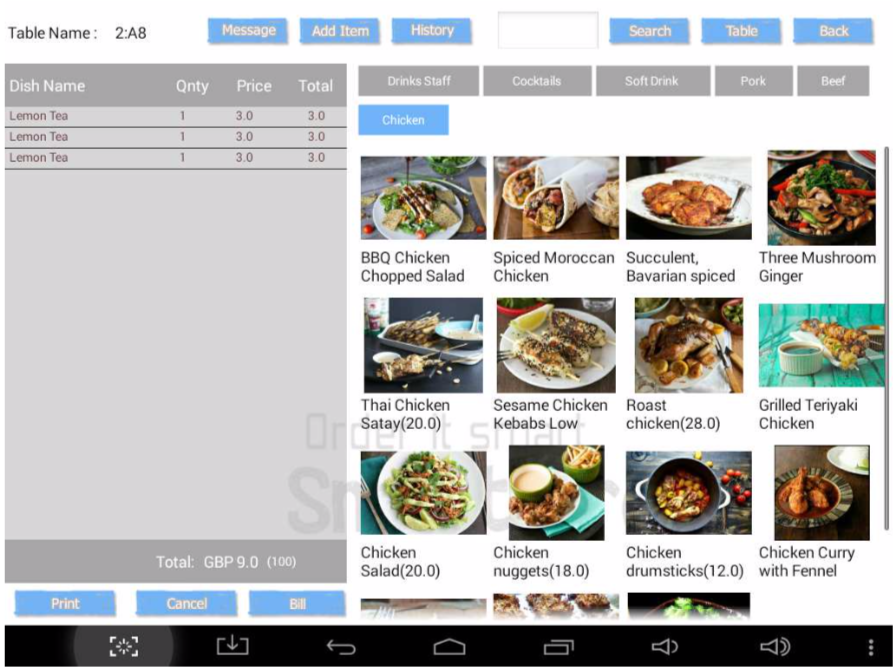
Bill
The process of billing is demonstrated below.
1) Press "Bill" in the ordering page to enter the billing page.
1) Press "Bill" in the ordering page to enter the billing page.
2) Press "Print" to print the bill for your customers.
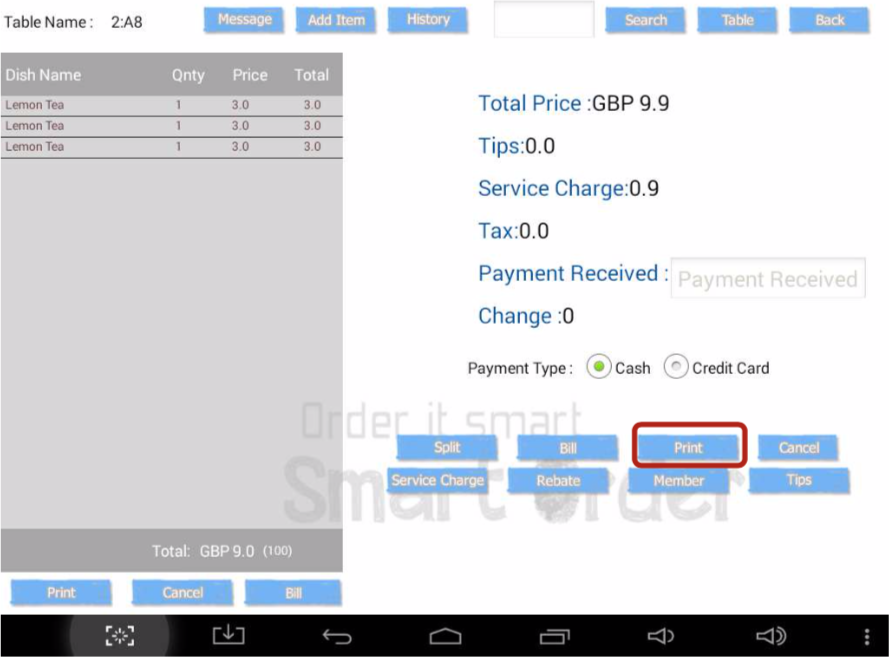
3) If the customer uses a coupon or you want to offer them a discount for other reasons, please press "Rebate".
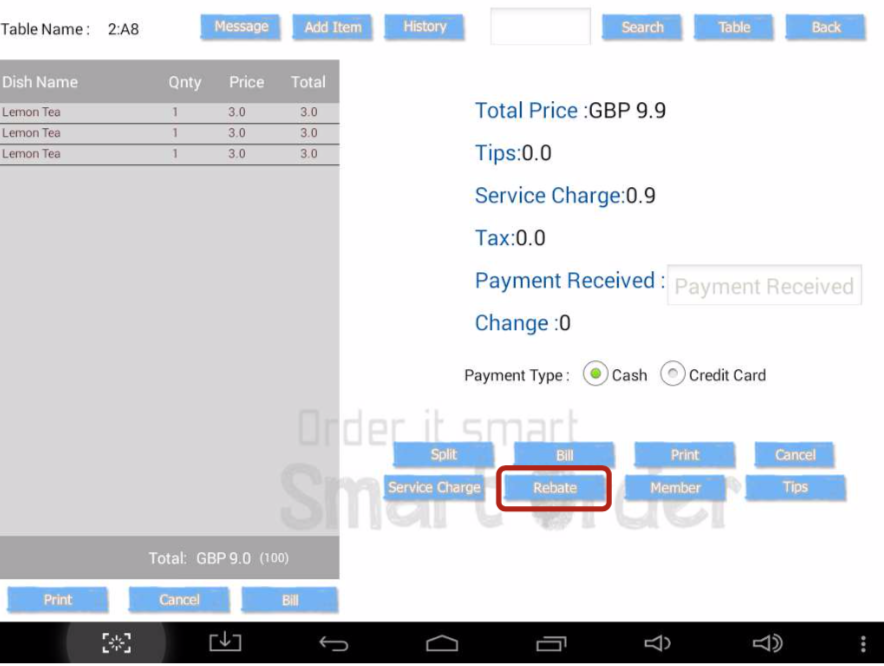
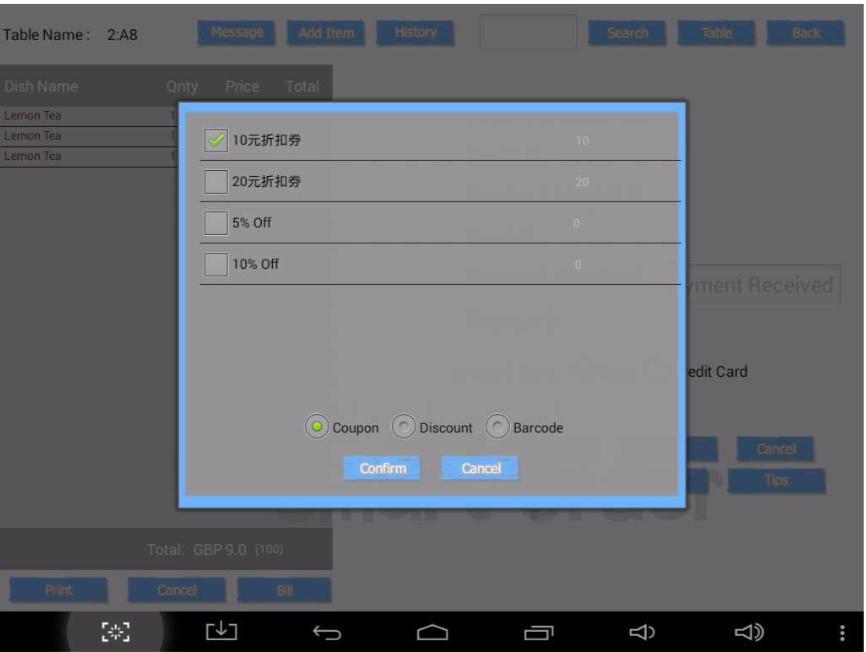
If it is a coupon, please choose it in the voucher list and press "Confirm".
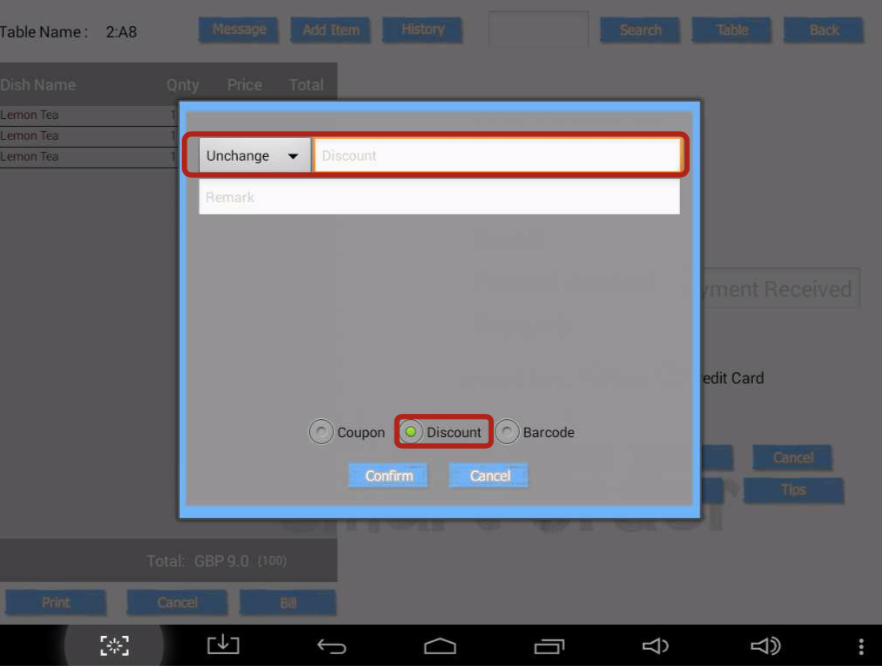
If the discount is not because of a voucher, please select "Discount" at the bottom then enter the dollar discount of percentage discount and press "Confirm".
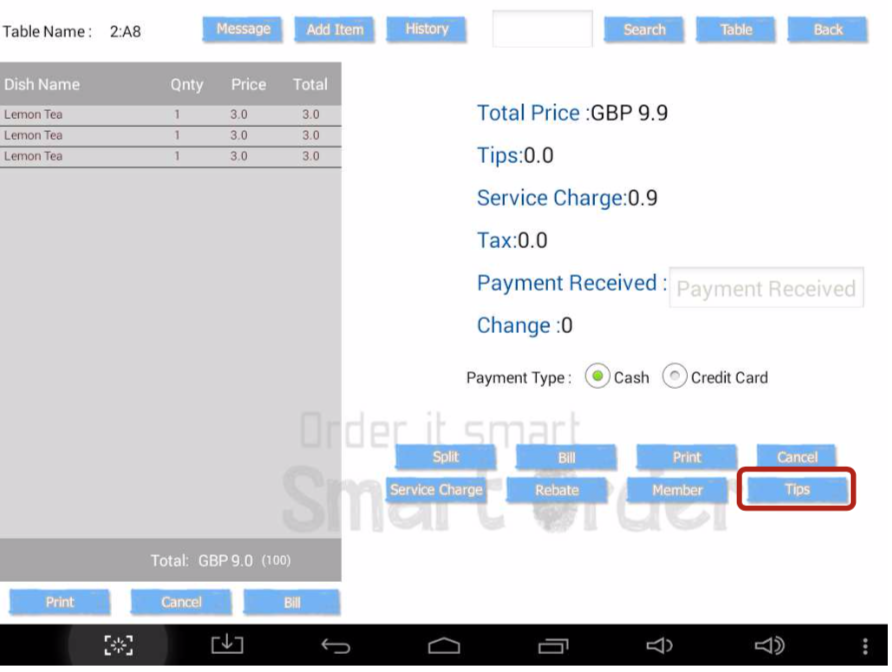
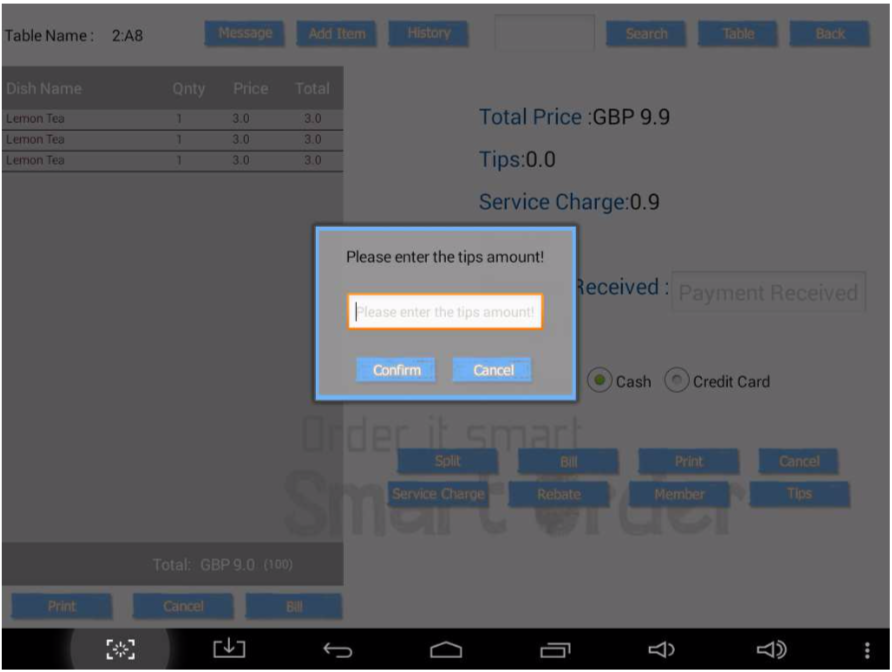
4) If the customer wishes to add tips, please press "Tips" . Enter the amount, then press "Confirm"..
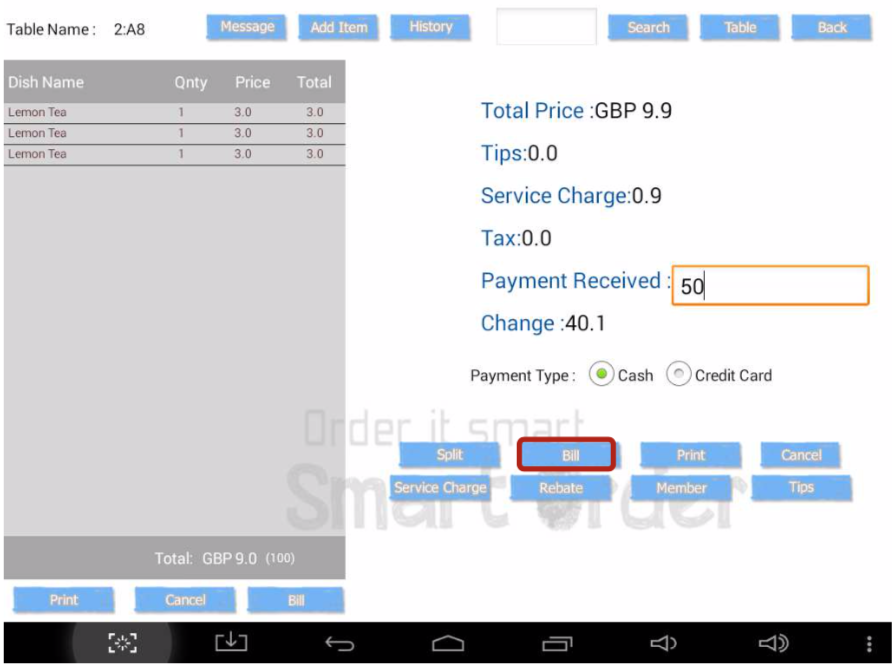
5) Please select "Cash" if your customer wants to pay in cash, or select "Credit_Card" if your customer wants to pay by Credit Card. By entering the payment amount, the system will automatically show you the change needed.
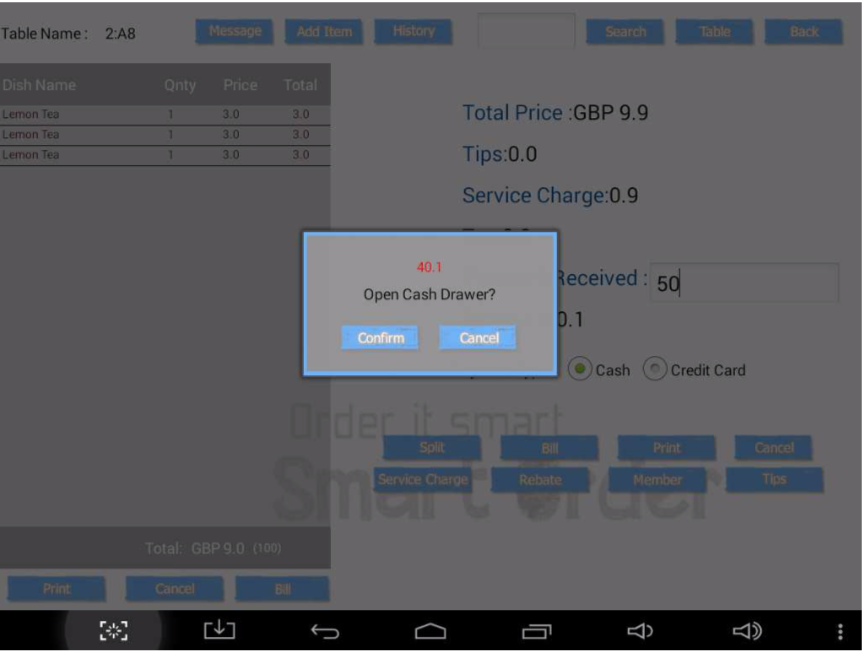
After pressing "Bill", you can choose to open the cash drawer or not.
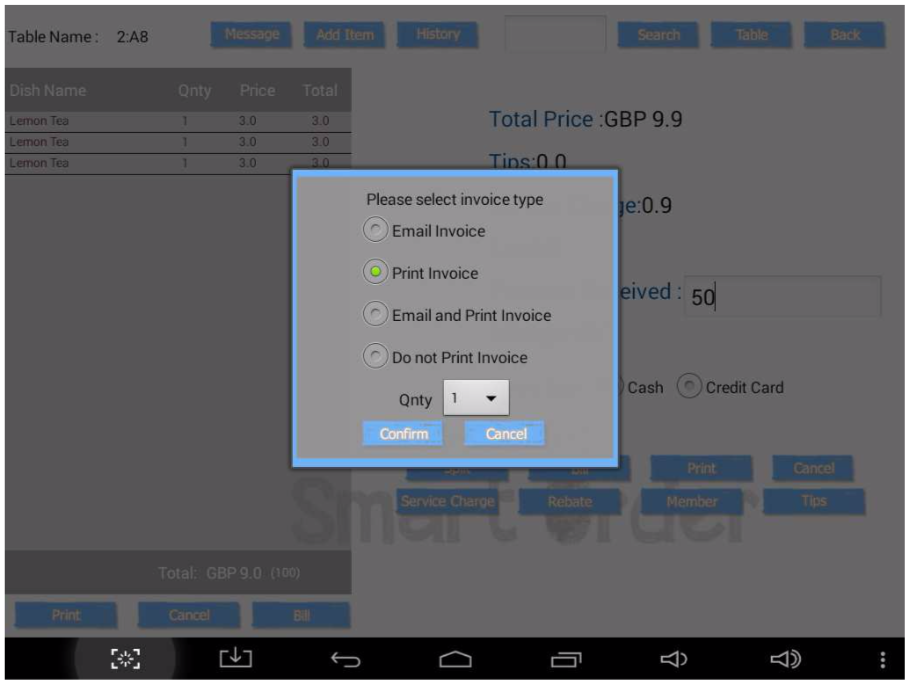
You can choose the invoice printing options. By pressing "Confirm", your choice is applied and the billing process is completed.
Administrative Functions
Administrative functions include cash flow report, employee check-in/ out and screen lock.
Cash Flow Report
To keep tracking your cash flow and operation, Smart POS provides the function of generation report.
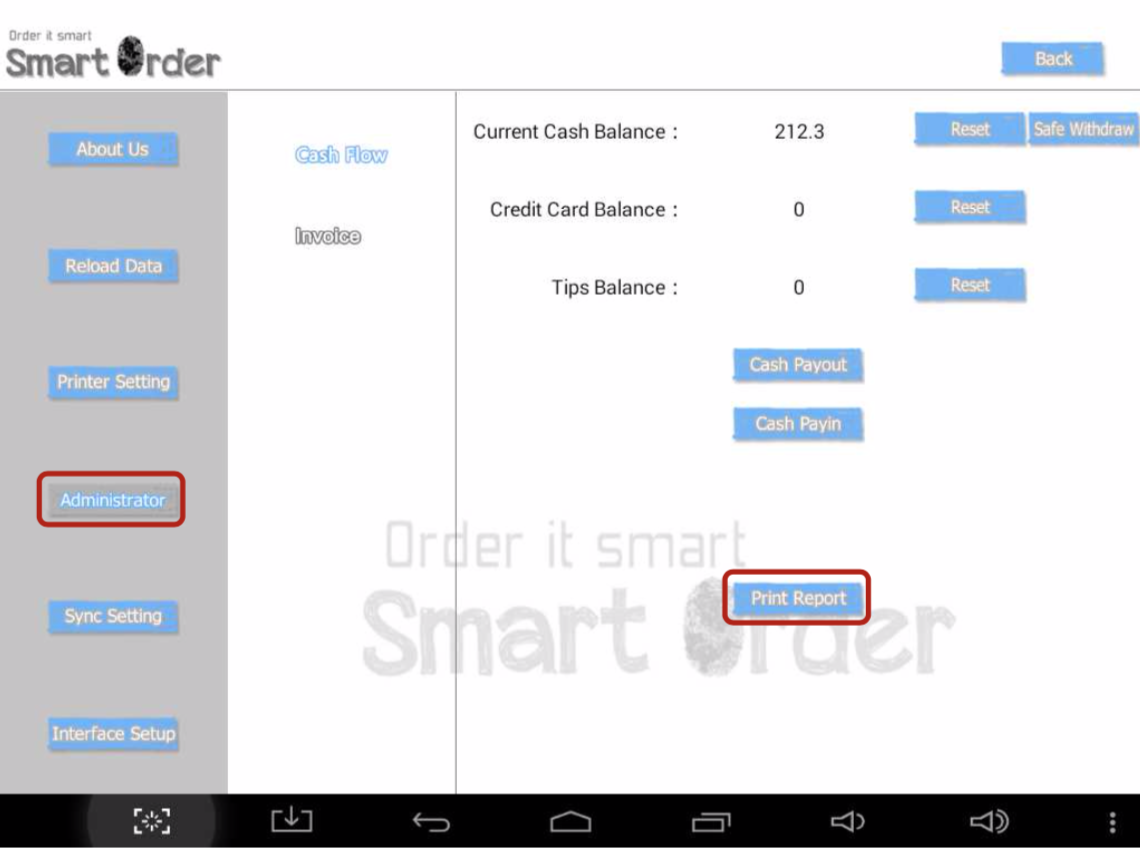
You can enter the administrator's page by pressing "Administrator" in the setting page. For entering the setting page, please refer to page 8. In the administrator's page, you can use this function by pressing "Print Report".
You can enter the administrator's page by pressing "Administrator" in the setting page. For entering the setting page, please refer to page 8. In the administrator's page, you can use this function by pressing "Print Report".
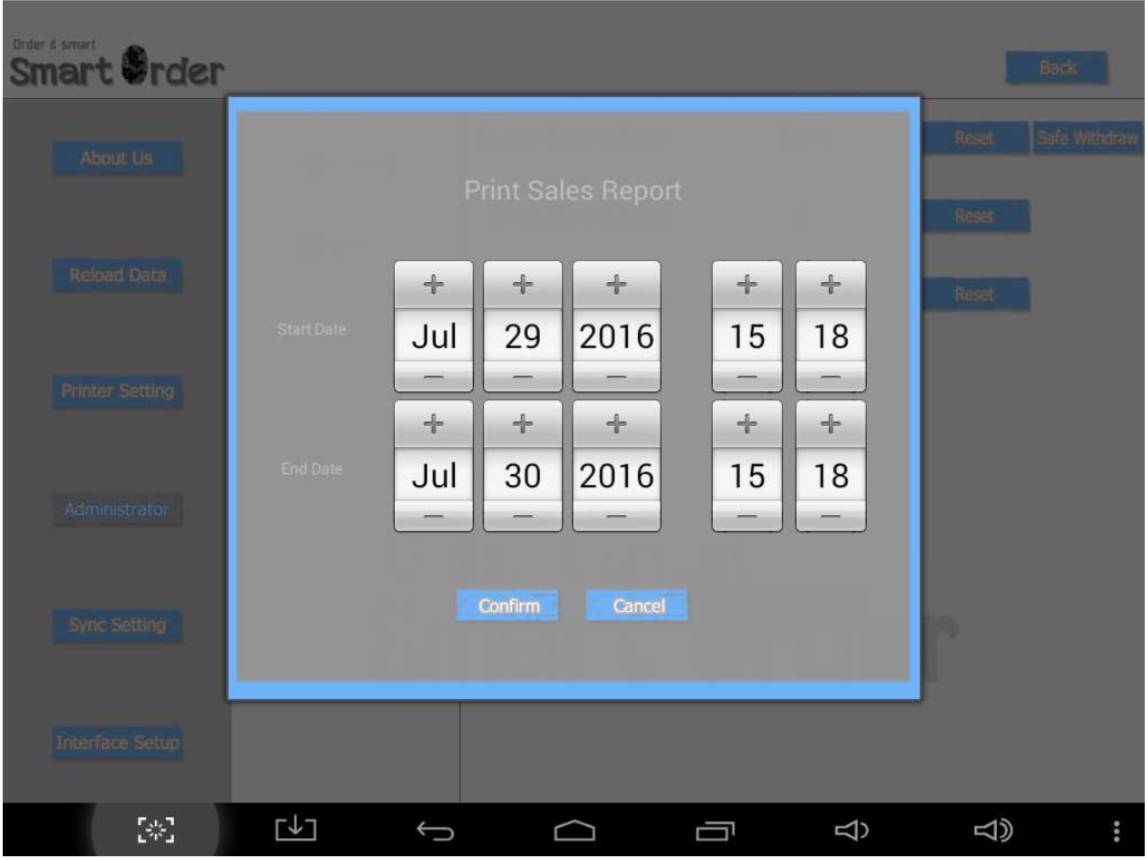
After choosing the date and time of the report, you can print the report by pressing "Confirm".
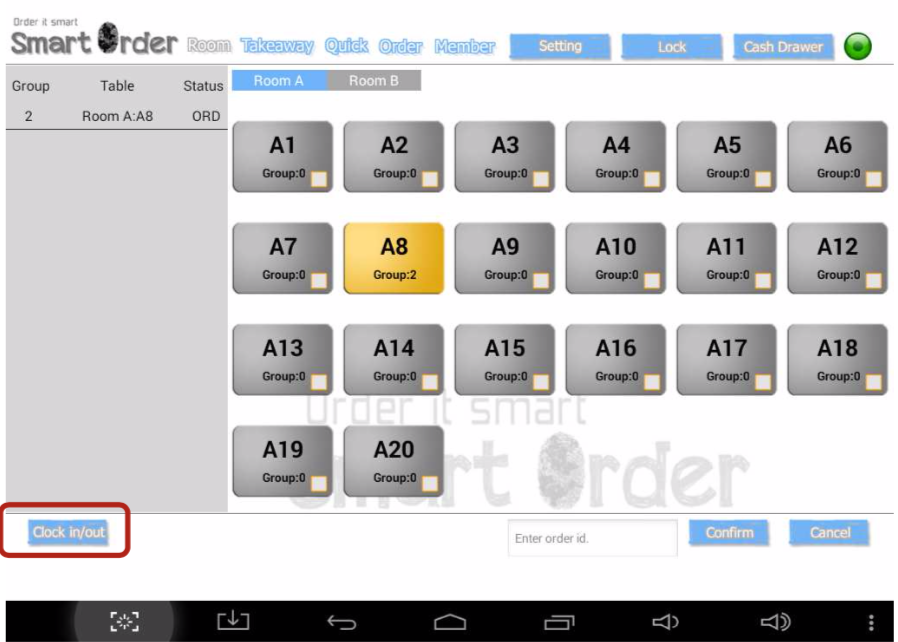
Employee Check-in
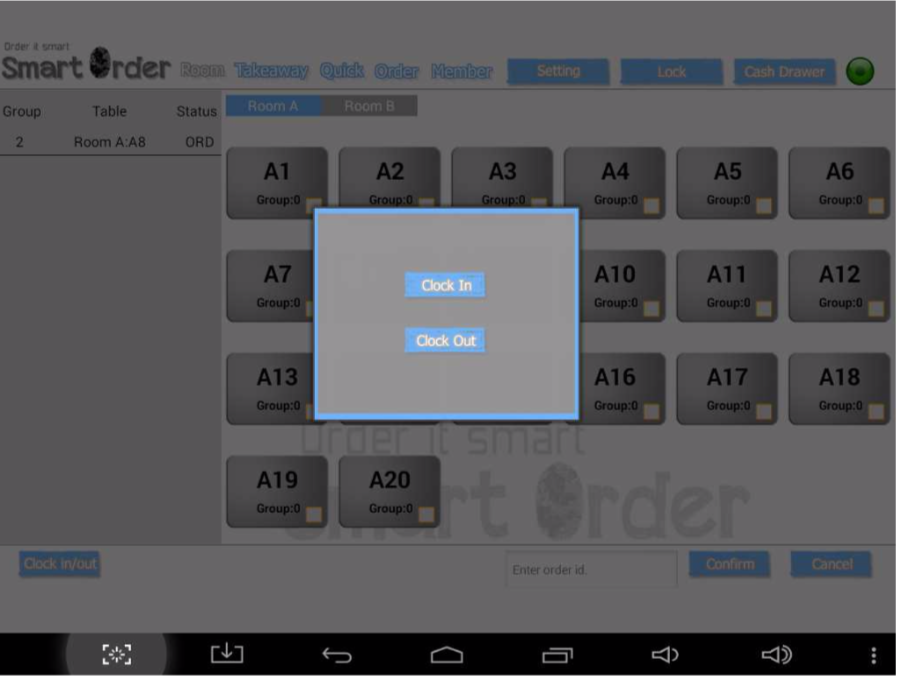
Press "Check in/ out" in the main page to use this function.
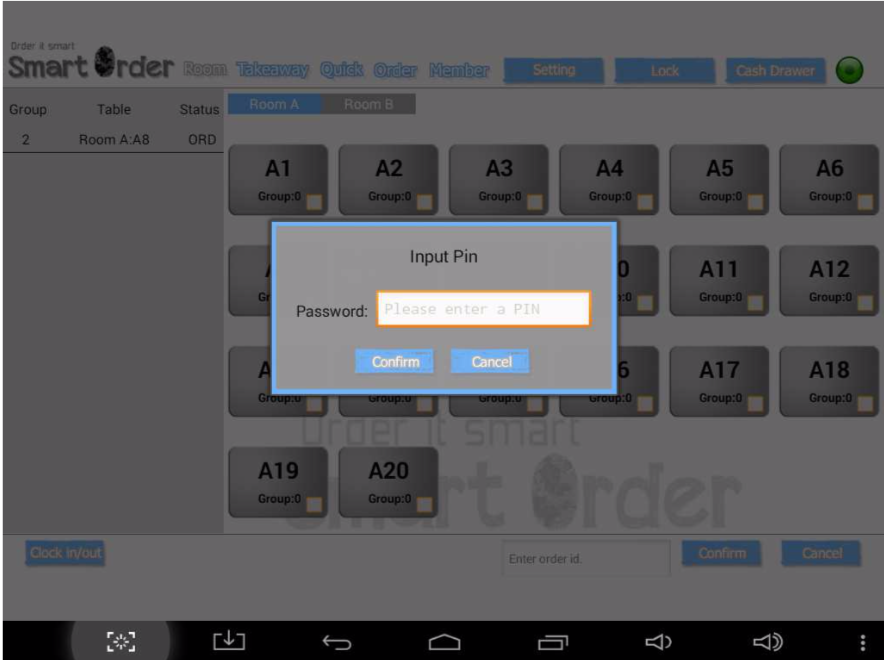
Enter the PIN of the staff member then press "Confirm".
Select "Check in" or "Check out".
Screen Lock and Opening Cash Drawer
You can press "Lock" to lock Smart POS or press "Cash Drawer" to open the cash drawer.

You can enter the lock screen password to unlock your Smart POS.
